
Just prefacing this blog with direction to help people who have lost their jewellery (either it’s fallen out by accident, or you have taken it out and can’t get it back in). Scroll to the bottom of the blog for info on what to do in an emergency situation like this.
So, let’s talk jewellery (my favourite topic!)
This blog was made during the COVID-19 (coronavirus) pandemic of 2020/21 – I decided it was a good time to put together some info about sizing and switching your jewellery, this information is particularly helpful at this difficult time, but something I know will be handy for you in the future too!
Often, I get requests from all over the country (and the world!) asking if I ship jewellery. The answer is YES! I love being able to help people get the most fabulous jewellery! However, as with people calling into the studio to buy jewellery as a gift, I need to know what size is required before I can help. A photograph of the person’s piercing/current jewellery is not always helpful, as it is impossible to measure something without having it in front of me.
Before we go any further, the absolute best way to buy jewellery is from a reputable piercer (inbox me if you want a recommendation for a studio local to you – wherever in the world you are!) and to call into their studio and get their help. A good piercer will look at your piercing, the jewellery you are wearing, maybe ask you some questions about how long it’s been pierced or how long you have worn the jewellery you have in and if you find this size comfortable. They will then ask if you have any ideas of what you’d like (if not, be prepared to be shown a LOT of jewellery!) you can see the items in person (so you aren’t trying to gauge something from a picture) and the piercer may be able to show you how a piece looks fitted via their portfolio – which is always helpful! When you have selected the jewellery, your piercer will explain if you need anything else to make it work (for example, if you choose a threaded end, but are currently wearing a ring, you will also need a post to screw the end onto) and give you a price on the whole piece – if your piercer has an anodiser, they can even change the metal colour, so will ask you this too! Most piercers (myself included) will offer FREE fitting on the jewellery, and install it for you there and then, making sure it is secure and fits correctly. So, you leave the studio with ‘the full Monty’ as it were.
**IF YOU ARE BRINGING BODY JEWELLERY INTO THE STUDIO, PLEASE BRING IT IN A BAG. I ALWAYS PUT JEWELLERY IN A BAG FOR YOU – OR BAG UP YOUR ‘OLD’ PIECE, BUT A FOOD BAG OR SMALL NON-POROUS BAG WILL DO THE JOB. LEAVE THE JEWELLERY IN THE BAG, I WILL TAKE IT OUT WITH GLOVES ON. THIS IS A HUGE HYGEINE ISSUE, AND THIS REQUEST IS MADE FOR THE SAFETY OF MYSELF AND OTHER PEOPLE IN THE STUDIO**
DO NOT put jewellery loose in your purse, pocket or handbag, ideally do not put it in a purse at all, as the coins can scratch and damage it, even through a bag, but if the jewellery is rattling around in a small space with money, which is the dirtiest object you handle in day-to-day life, it is a massive hygiene issue. Keep your jewellery bagged and in a safe place – an EMPTY and CLEAN tobacco tin, Tupperware box or jewellery box is ideal.
Body jewellery is designed to be taken in and out, so it can come loose. This sucks, but it is something that CAN happen and is sometimes ‘just one of those things’ – we’ll talk about how to check your jewellery to make sure it is secure later in this blog.
This being said, it all sounds pretty simple…. But let’s look at it from the piercer side, what goes on in your piercer’s head while the above is going on?
Here’s my usual chain of thought:
New jewellery? Awesome! Let’s see the piercing….
Yeah, that looks healed, we can switch it! (If it isn’t, we then choose pieces that will work without causing any undue stress or irritation to the piercing).
It’s a ring, looks a bit big, so a smaller one might be better… maybe an 8mm?
Oh, they want a stud… hmm… 6mm length should do it.
Ok, show them the threaded ends, see what they like.
They just want a small gem…. Ok, what colour? What setting? What size?
Clear gem, 4mm. Niiice.
Prong setting or disc?
Disc. Sweet, that will sit nice and flat.
Metal colour?
Purple, oh man, this gem is gonna look so good with a dark purple casing around it.
So its £x for the disc, £x for the bar, that’s £x in total, free fitting. Let’s do this!
When someone comes in to buy jewellery for someone else, or messages me with the generic “I need new jewellery for my ear piercing” it’s hard to work through that chain of thought, as I can’t see the piercing in question to make the decisions I need to make. All the above are things your piercer needs to know to ensure you have an appropriate type, size and fit. Sometimes certain jewellery types don’t work in a certain piercing – almost daily people come in and ask about the septum/daith clickers for a helix piercing. While they will fit, the gems are on the wrong plane of the jewellery, so won’t sit as desired. This is hard to explain over a message, so once again, it’s best to call into the studio.
When messaging about jewellery, the following are helpful:
What piercing is it for?
How long have you had it? (Is it healed?)
Did I do it? (this will help me figure out what is in there at present)
What gauge (thickness) is it?
What length/diameter do you need?
What thread type (if applicable)?
What item you like the look of (this way your piercer can suggest alternatives, if that exact item is unsuitable/unavailable).
If the piercing is still healing, or if you’re having trouble with a piercing, certain jewellery types may not be suitable, simpler, less fancy styles are usually best for fresh/healing/problematic piercings – and rings are often best left for healed piercings (in most cases).
Here’s a guide to the names of some jewellery types – knowing your types will help you choose!
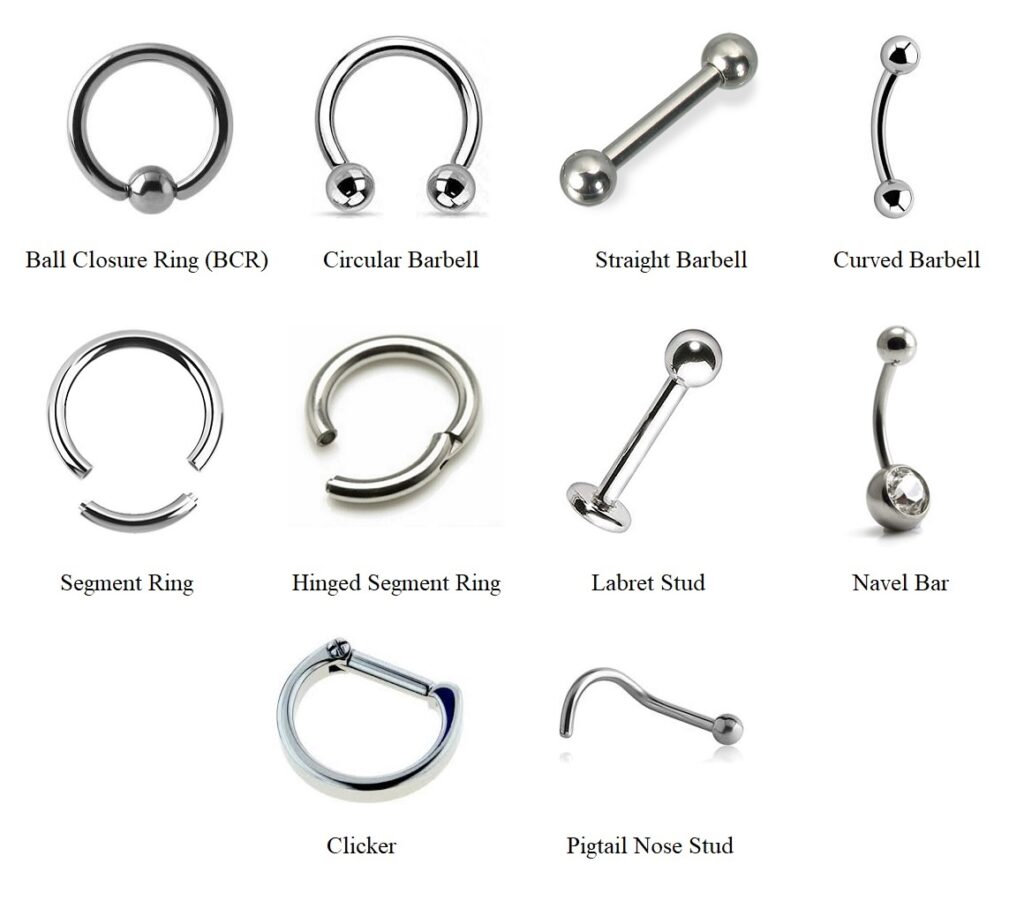
Hopefully this will explain why it’s best to call into the studio for jewellery, but please do message with as much info as you can about your piercing/jewellery and the piece you like the look of. As always, I have photos of my stock up in my picture section on Facebook and you can screenshot any items you like to either send to me, or show me in the studio so I can direct you to it.
If calling in is not possible, send me as much info about what you have and what you’d like, and I will do my best to help – firstly we’ll look at how to measure your jewellery. It’s hard to do without callipers, but you can get a rough idea with a ruler! Below is a chart showing what measurements you can take. Note that the ball size is NOT included in the length of items! Only the ‘straight bit’, and you always measure the INSIDE of the ring.
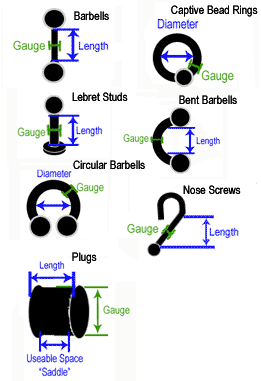
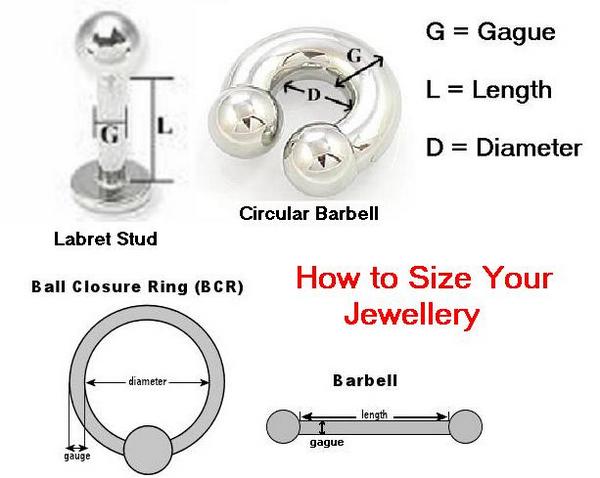
Often when people are buying jewellery for someone else, they will say “oh just the same size as mine” – all bodies (and body parts!) are different, there is no ‘one size fits all’. Nose piercing is a perfect example of this. I usually pierce noses at 1mm, unless requested otherwise, so if I did the piercing in question, its more than likely it will be at 1mm (unless the client has put a different size in themselves… which is ANOTHER consideration!!!) but then for the ring diameter, it could be anything! 7mm, 8mm or 9mm are the 3 most commonly seen, but there isn’t a ‘right’ size that fits everyone.
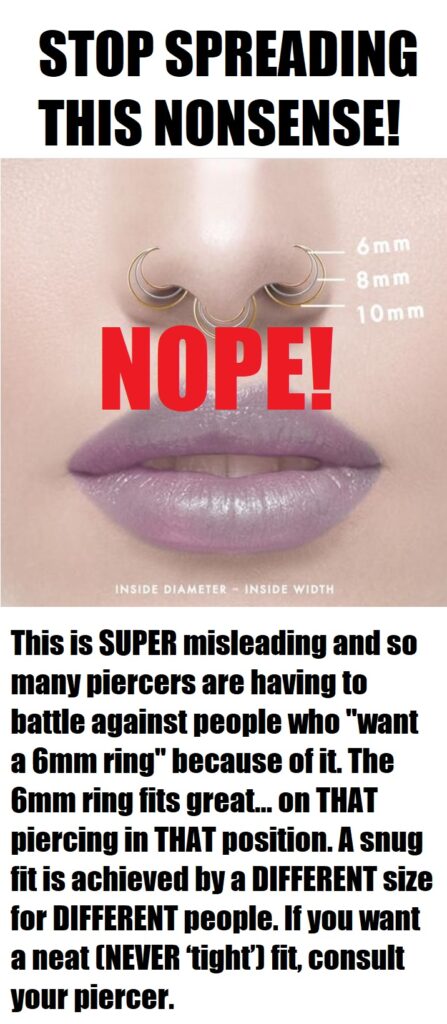
Below is a [doctored] pic from Instagram. This is wildly misleading, because everyone wants a snug fitting ring (which look amazing BTW) so people come in and ask for a 6mm ring, and refuse to accept anything else… THIS nose with the piercing in THIS position needs 6mm. YOUR nose with YOUR piercing will likely need a different size (the majority of nostril piercings I do work with an 8mm ring, but again, this isn’t absolutely definite).
So, you know what jewellery and what size you want. I pierce mainly with internally threaded jewellery (I occasionally use push fit too) and ALL my stock in the cabinets is internally threaded or threadless. This means that for most piercings, if you want a stud, it will have to have an internally threaded post to screw the jazzy new end onto. If you already have an internally threaded stud in the correct size, it can absolutely be re-used… but if not, you will need to purchase a new one.
This infographic illustrates the different thread types. The push fit will have a slight bend in the pin to hold it in place.
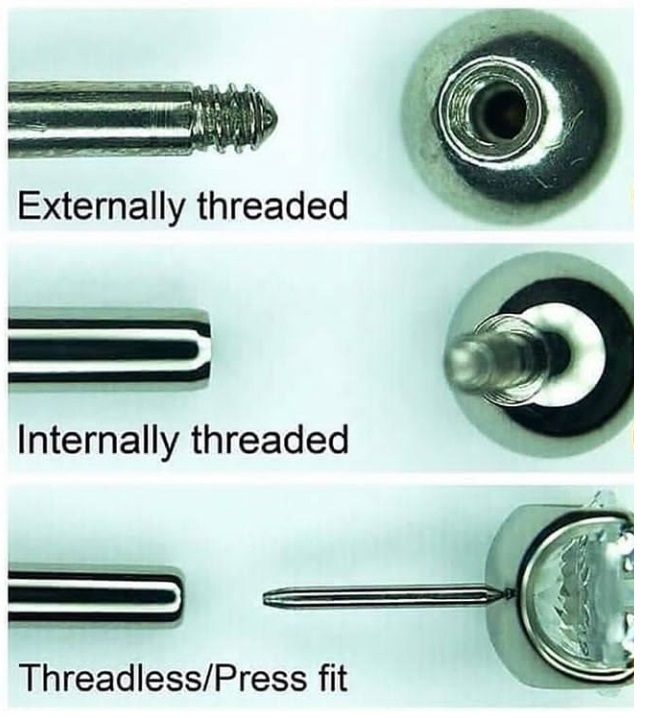
As you can see, the internally threaded jewellery has a little ‘stick’ on the ball (or whatever end you have) which goes into the bar, then you screw it on until its tight. There are many reasons for my choice to use only internally threaded (that’s a whole other blog in itself!) but for the purposes of what we are discussing, I have found this is the most secure fitting and results in the least amount of “Please help, my ball has come off!” messages. A lot of people message and say their jewellery has ‘broken’ as they are used to the externally threaded type, but this is not the case, it’s just a different thread, and WILL screw right back in. This isn’t hard to do BUT it is fiddly – get someone to help you, and wear gloves for a better grip!
If you lose an end, don’t panic! Try and screw it back in (you don’t need to take the post out) righty tighty, lefty loosey! So, turn the end clock-wise (to the right) to tighten it back on.
Same to check/tighten your jewellery. If you can feel the end turning (if the whole stud is turning, that’s ok!) then make sure it is tightened to secure it. If you run a thumb/fingernail along the length of the straight part of the stud, it should be smooth right up to the ball/disc/whatever, if you feel a little ‘step’ the end may be loose! Tighten it yourself (turn the end clockwise – or if it’s a threadless/push fit piece, press the decorative end further into the bar) or return to your piercer. If you’re in with me getting another piercing/jewellery change, just ask and I’ll check a piece is secure for you!
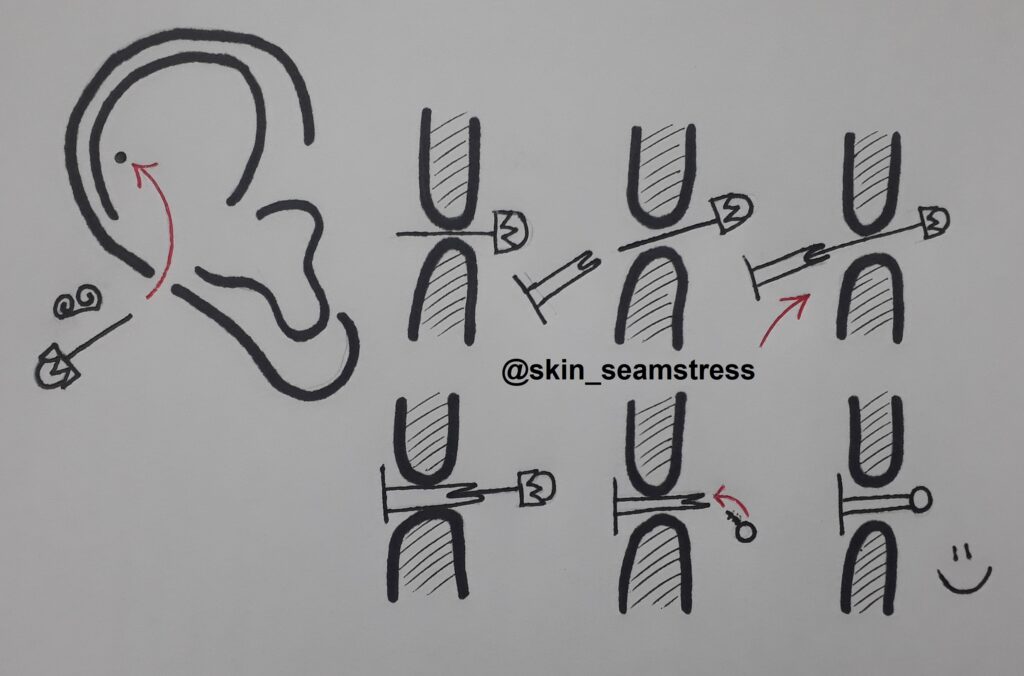
Getting the stud back in if the whole thing has fallen out can be fiddly – again, getting someone to help is usually best! So, don’t remove it unless absolutely necessary! But if it has come out, hold the ball/disc (in the case of a labret stud) and push it back through – this is easy if you’re putting it through somewhere you can see easily (tongue, nipple, navel, lip, eyebrow) but on ear and nose piercings, where you may have to put it through from the back, it can be awkward – I’ve attempted a step by step guide of diagrams below! Using a standard butterfly back earring (one of your own, do NOT use anyone else’s jewellery!) put that through from the front, so the post is sticking out of the back (the side you need to put the ‘proper’ jewellery in from), then place the thin wire of the earring into the hollow end of the stud (where the ball would screw in) and push it forwards, so the earring guides it into place. Then screw the ball/end on – if you can’t screw the end on, see later in this blog for what to do in an emergency!
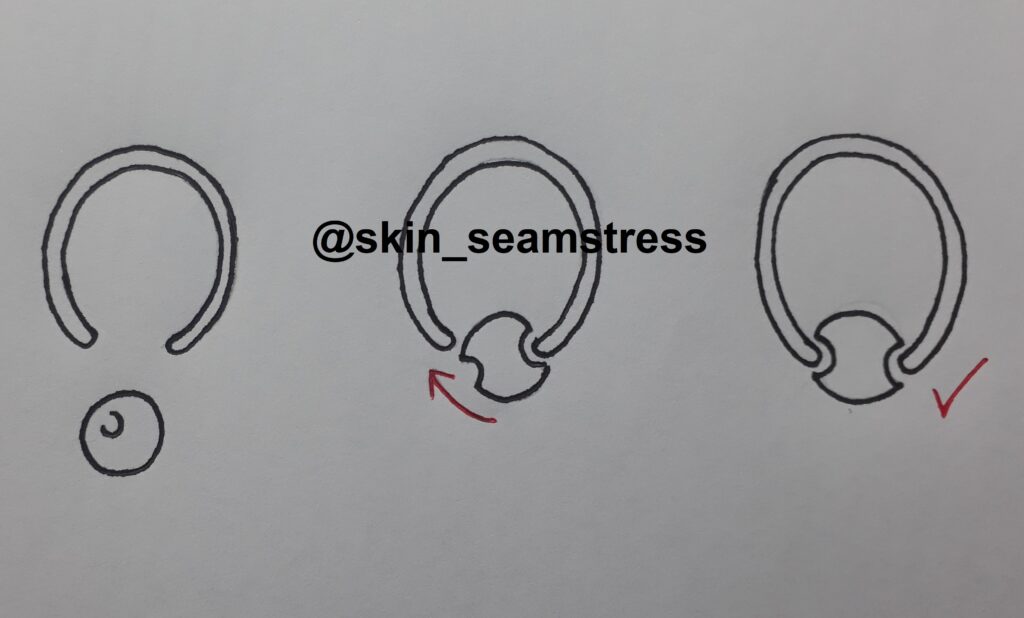
So that’s threaded jewellery, what about nose studs, hinged jewellery (clickers and hinged segment rings) and clip-in pieces (BCRs or segment rings for example)?
Nose studs are an easy one – they have no attachments, just a solid piece, hold the ball/gem/fancy bit between your thumb and first finger, then push the end of the ‘curl’ into the hole, and twist slightly.
For hinged segment rings and clickers, open the jewellery (it’s attached by the hinge, so you can’t lose it!) and slide it through (hinge segment rings, it doesn’t matter which side you do it from, but for clickers, make sure the detail is going to point in the right direction). Once the post is clear of the skin, you can push the rest of the jewellery to meet it, and you’ll hear/feel a satisfying ‘click’ when it closes.
BCRS (or rings with a clip in detail) are fiddly, and for the hundredth time, get someone to help you! Segment rings where the entire segment comes out can be VERY hard to do – I don’t currently stock these, as hinged segment rings have hit the market in the last few years, and they are so much easier. Get the ring through the piercing (doesn’t matter which side you put it in from) and then the attachment has a small dimple either side, the ends of the ring are both in contact with this and it holds the attachment in place with the magic of tension!
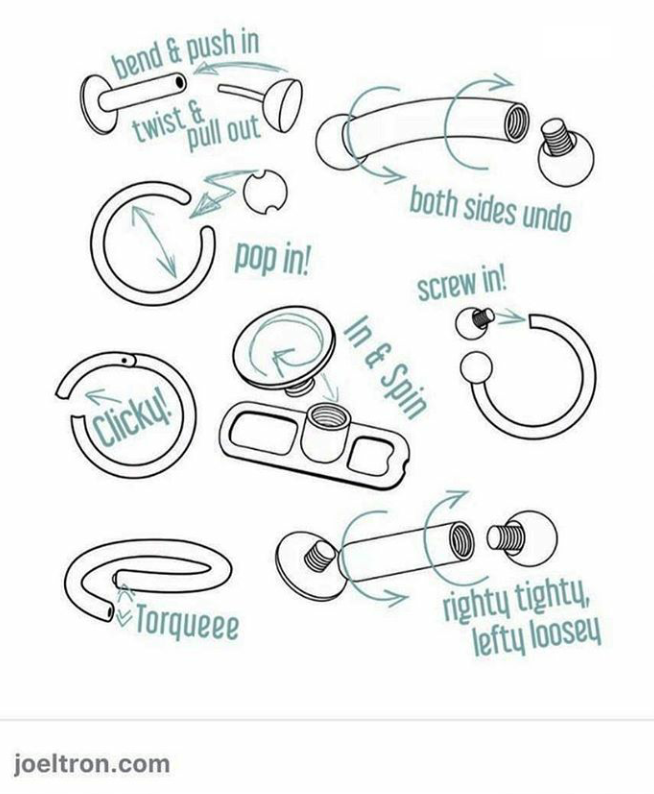
Keeping an eye on your jewellery and checking everything is screwed (or pushed) in regularly will reduce the risk of you losing your jewellery, and to do this it’s important to be familiar with your jewellery type. Here’s a great little infographic from joeltron.com that shows all the different types and how they fit!
WHAT TO DO IN AN EMERGENCY!
Sometimes, life has a terrible plan for you that involves you wither not being able to get the attachment on… or losing the entire piece, or not being able to get it back in! As mentioned above, body jewellery is designed to be taken in and out, meaning there’s no way to 100% guarantee that jewellery will never fall out. First things first…. Don’t panic!
Getting the jewellery back in there IS important if you want to keep the piercing – how long you can leave it out for without it closing is impossible to say, there’s no formula for how long you have had the piercing vs how long you can leave it out for without it closing, but fresh/healing piercings will close up MUCH faster than healed ones.
See the pics just above that show how jewellery works, and how to guide a stud back into the piercing from a ‘fiddly’ angle/position.
If you can’t get the attachment on, bag it up (see above) and bring it in, and I’ll do it for you (if the jewellery is bought from me, this is free of charge – I do not fit jewellery from elsewhere). And until then, just keep the bar through! You can pop a plaster on the side that has a ball or disc to keep it pushed in, and I’ve seen some wonders worked with a small ball of blu-tak squished around the ‘missing’ end of the bar.
If you can’t get the post back in, bag it up, and bring it in and I’ll do it – but do bring it in, as we can possibly re-use it, saving you some cash! If you have lost it completely, remember I always have spare pieces. In either case, try and get SOMETHING through there, if you lose a stud, but can get a ring in (or vice versa) that’s fine, even something at a smaller gauge is better than nothing. Butterfly back earrings are NOT an ideal thing to keep in your piercing, but in an emergency, this will keep the hole open. The hole shrinking a little will suck BUT it’s better than it closing up completely. We can taper back open, which will feel a little uncomfortable, but it’s easier than having to get it re-done. Call in as soon as you can to pick up some new jewellery or have your old piece refitted, just leave your temporary piece in there and I’ll take it out and fit the appropriate piece for you.
These things happen, and this is why I always give clients their old jewellery back! So that you have a spare in case you ever need it! Be it an end, or a whole piece, in an emergency, you’ll be glad of that little baggie! 😊
I hope this saves some piercings, and some pennies! – and remember, it’s not the end of the world if something closes up, most of the time re-piercing is absolutely fine! And tapering a piercing open (not re-piercing it, just using a small taper to widen the hole so jewellery can be refitted with no break to the skin) is often possible! The sooner you get back to me (or other reputable piercer) after a jewellery mishap, the better – these things are an easy fix the sooner we get to fix them!