
Lumps and bumps are the most common problems we see with healing piercings – they can cause alarm, as they do show up very quickly, and can take a while to go down. In this blog we’ll talk about what they are (and what they are not), what causes them, and most importantly – how we can prevent them or treat them. There’s a LOT to go through – I’ve put a TL;DR at the bottom of the blog, but for a more extensive look at the problems associated, see the bulk of this blog (sorry, it’s super-wordy but I can’t seem to be brief!) ALL photos in this blog were found on google – please email me on skinseamstress@hotmail.co.uk if one of the photos is yours and you would like to be credited, I will of course add this in.
Before we start, here are some examples of irritation bumps.


Most people with piercings will experience these ‘bumps’ at some point. One of my nose piercings – which I have had since 2010 – will kick off and look like this if I catch it with a towel.
WHAT ARE THEY? (And what are they NOT?)
What are they? The fistula (fancy name for the tube of scar tissue, which is what a piercing is!) if this scar tissue gets irritated (‘irritation’ is a broad term, we’ll look at the ways this happens next), it swells/increases in size a little due to the irritation, and this swelling/increase in size will pop out at one (or both) ends of the piercing. They are usually on one side of the hole, but they can sit all the way around it (like a donut). Lumps and bumps are most commonly seen on healing piercings but they can appear at any time in a piercing’s life if this ‘tube’ of scar tissue gets irritated. Sod’s law means that it is usually the visible side of the piercing that this happens at!
The lumps/bumps can grow, and shrink, and come and go – this is normal for them. It is rarely (if ever) a sign of infection. Side note: as a piercer, I’m not allowed to diagnose an infection – the only way to diagnose this is with a swab test at the doctors. Signs of infection include a bright red ring around the piercing, a burning pain, heat from the area, a constant discharge (dark yellow-green) from the piercing.
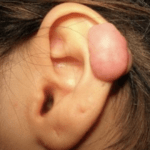
What are they NOT? A word I hear a lot when people are talking about lumps and bumps is ‘Keloid’ – it’s important to look at the differences between the two. Keloid scarring is quite rare, and people who suffer from it are often told about it as children, when a cut, graze or surgery causes a keloid scar to form. I’m not a doctor or dermatologist, so I can NEVER diagnose a keloid (or say something ISN’T a keloid) – if you’re concerned about this, you would need to speak to a doctor or dermatologist. Be aware that if you go to a doctor with a piercing problem, they will usually tell you to remove the piercing completely. Doctors need to provide their patients with the fastest, easiest, and most effective and efficient treatment – this means if they see an irritated piercing, they know that the fastest way to get rid of the irritation and the symptoms/problem is to remove the jewellery and let the piercing heal up. Because I’m not a doctor, I CANNOT advise anyone to go against what they have been told by a medical professional. Most of the time, removing the jewellery will get rid of the lump/bump, but this will mean you lose the piercing as well – however, re-piercing is always an option.
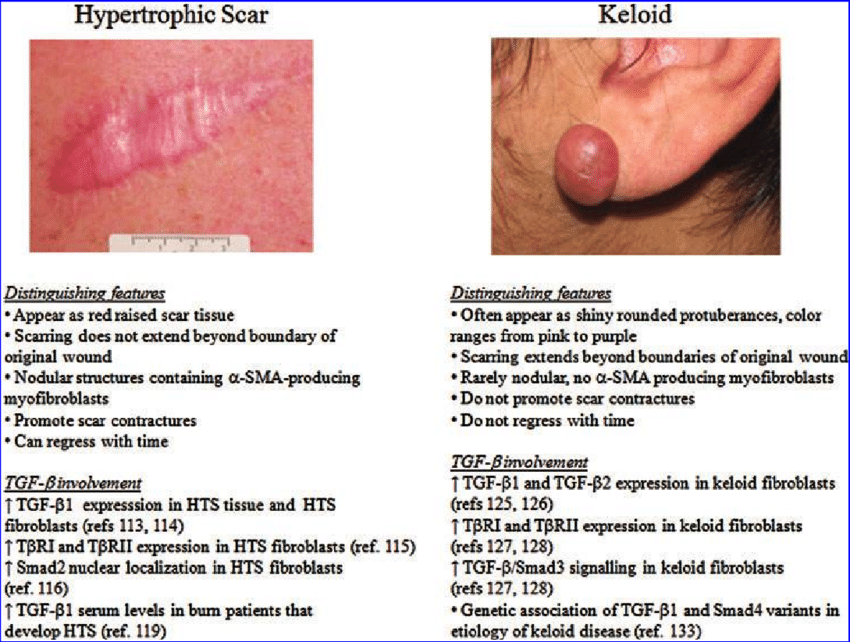
Something I hear a lot from clients is “Oh, I had a keloid on there, but it went” – this means it’s very unlikely that this was a keloid, as keloids do not go without medical intervention (surgical removal and steroid injections are 2 ways in which they are treated). Keloid scarring extends beyond the wound and is usually quite bulbous – a scar being raised is NOT a keloid.
I don’t want to focus on a discussion of keloids, as they are something best discussed with a doctor or dermatologist, but it’s important to understand that in almost all cases I see of lumps and bumps on piercings (irritation bumps), they are NOT keloids and they WILL go with the proper care.
Visible scarring is not necessarily a keloid – keloids are most commonly bulbous and extend beyond the parameters of the wound, example below with info on the different types of scar.

WHAT CAUSES THEM?
The cause of lumps/bumps on piercings is ‘irritation’. This is a really broad term, because there are a lot of things that can cause them – sometimes it only one of the following, sometimes it’s more than one – so it’s important to make sure you’re considering ALL the following. We’ll look at each point in depth below.
Movement of the jewellery (intentional or not).
Touching the piercing/jewellery (linked to the above, but worth its own section).
Not cleaning enough or over-cleaning.
Using the wrong product to clean the piercing.
Poor quality jewellery and/or inappropriate size/type.
Not drying the piercing thoroughly after cleaning.
Sleeping on the piercing.
Make Up/hairspray/fake tan/skin products/other foreign bodies getting into the piercing channel.
Poor health – being ill, run down, recovering from illness/injury, dehydration, pregnancy.
Movement of the jewellery (intentional or not).
This is by far the most common cause. The jewellery moving through the piercing causes the channel to become inflamed. Many people get told to ‘twist the jewellery’ when having their ears pierced with a gun – and of course you will follow the instructions given. So, this is often something people continue to do, and it is a hard habit to break, but moving the jewellery (twisting, pushing, pulling, sliding back and forth) is like pulling the scab off a wound – your body is trying to heal around the jewellery, so if its constantly being moved, it simply can’t do this. Another risk with playing with the jewellery, you could unscrew part of it, lose the jewellery completely and potentially have the piercing close up (meaning you need to get it re-pierced). And in the case of oral piercings, playing with/moving the jewellery can also cause damage to your teeth/gums.
Accidental knocks and snags can have the same affect – your body unfortunately can’t tell that you didn’t mean to snag it on your jumper, or that your dog just got too excited and caught it with their paw, or that toddlers move with ninja-like precision and will grab at anything they take a liking to. So, if you get a lump or bump after snagging it, this is likely the cause – just leave it alone as much as you can, even if it is a fully healed piercing, go back to your cleaning routine and let your body recover itself (it will, I promise).
How to fix it: Be mindful of when you touch your piercing – tell friends and family that if they see you doing it, they should tell you to stop. If you do find your hand drifting towards your piercing, ask yourself “am I cleaning it?” (This is the only time your hands should be anywhere near it!) and if the answer is “No”, then stop and leave it alone. This IS a really hard habit to break, but if you can manage to stop, it will REALLY help your piercing.
Touching the piercing/jewellery
This is kinda linked to the above, because even touching the jewellery lightly will move it. But the main reason this needs its own section is because bacteria and germs are very easily spread onto your piercing/jewellery – AND in reverse, bacteria or blood (if your piercing has been bleeding) getting on your fingers and then being spread around (onto door handles, mobile phones, etc). This is why piercers will always ask you not to touch your piercing or handle previously-worn jewellery when in the studio. Washing your hands BEFORE and AFTER touching your piercing (i.e., cleaning it, or changing the jewellery if it has healed) reduces the risk of any cross contamination.
How to fix it: (As above) Be mindful of when you touch your piercing – tell friends and family that if they see you doing it, they should tell you to stop. If you do find your hand drifting towards your piercing, ask yourself “am I cleaning it?” (This is the only time your hands should be anywhere near it!) and if the answer is “no”, then stop and leave it alone. This IS a really hard habit to break, but if you can manage to stop, it will REALLY help your piercing.
Not cleaning enough or over-cleaning.
There is a very fine line between ‘not enough’ and ‘too much’ and that line will vary from person to person. I always recommend twice a day for most piercing types/placements, with one of those daily ‘cleans’ being after a bath or shower, ideally. Then once the piercing is about halfway through the expected healing time (usually around the time you would get the jewellery downsized), dropping cleaning down to once a day until fully healed, and then just washing it as part of your bath/shower routine with a fragrance-free soap (and rinsing/drying thoroughly – we’ll cover the importance of drying later in the blog). Cleaning involves both touching the piercing and the area around it, and when using a cotton bud, it can mean the jewellery moves (see above). This means – if you’re cleaning 4, 5, 6 times a day – it can have a reverse effect to what you expect. On the other hand, not cleaning enough can mean you get a build-up of ‘crusties’ – this is especially true with ornate jewellery, which is why we usually stick to simpler pieces for healing (see later in the blog for jewellery discussion!) if bacteria and foreign bodies (makeup, hairspray, etc) isn’t cleaned away, your body has to ‘fight’ this, which causes MORE ‘crusties’ building up.
It can be hard to get a good look at your piercing, especially if it isn’t somewhere easy to see in a mirror (behind your ear for example), so ask someone to help you until you get the hang of it.
How to fix it: It certainly seems counter-productive to clean your piercing LESS if it is playing up, but if the piercing is more than a couple of months old (and is no longer an ‘open’ wound), it’s worth a try to drop the cleaning down to one a day. If it flares up after dropping down to once a day, step it back up to twice a day. If you’re cleaning it less than twice a day, try stepping up to twice a day and see if you see an improvement – always make sure you’re using the right product to do this (see below). Giving your piercing a good ‘swoosh’ when in the shower will help – especially in those hard-to-reach areas – so use this to your advantage, just remember to work around it gently with a cotton bud to get rid of any build-up. I always find it easier to build ‘piercing cleaning’ into my daily routine – I brush my teeth twice a day, so when I brush my teeth, I clean my piercing.
Using the wrong product to clean the piercing.
Probably the 2nd most common cause (after moving the jewellery) of lumps. The only things I recommend to use on a piercing are saline solution and clean, warm water. The exception to this is the inside of an oral piercing/a piercing which is entirely within your mouth (alcohol free mouthwash) and intimate piercings (a fragrance-free intimate wash, such as ‘femfresh’). Anything other than these things should NOT be used. Swooshing your piercing with the shower head while you’re in there, or rinsing with CLEAN water just before you hop out of the bath is also a good idea (dry thoroughly afterwards – see later in the blog).
Twice a day (ideally one of these two daily ‘cleans’ should be after a bath/shower, rinse your piercing as above before getting out to make sure any shampoo, shower gel, etc is removed), either spray saline onto your piercing OR onto cotton buds (2 cotton buds for each piercing). Use the wet end of the cotton bud to clean around one side of your piercing, use the OTHER wet side to clean the other. If you sprayed your piercing with saline, use one end on either side to clean any build up/crusties off. Then use the final ‘dry end’ of each cotton bud to dry the piercing. There’s more to say about drying later in the blog.
So, saline, it IS ‘salt water’ (sodium chloride and water) … BUT! Do NOT be tempted to make up your own. Saline is a very specific ratio (0.9%) which means for every 100g of water, you need 0.9g of salt. No more, no less. Saline is easy to find, cheap and perfectly safe to use AND you don’t have to spend 10mins twice a day boiling the kettle, mixing it up with salt, allowing it to cool, cleaning, then dumping the rest of it down the sink. With ready-made saline, just spray, clean, dry, done! Saline is used to irrigate wounds in hospitals, store contact lenses, rinse chemicals out of eyes…. If it is safe enough to squirt in your eye, it is safe enough to clean your piercing with!
Harsh chemicals, antiseptics, ointments, creams, etc will irritate the piercing (even if diluted) and if they aren’t rinsed away, they can cause chemical burns. Surgical spirit in prolonged contact with skin can cause callouses, not something you want on an already-poorly piercing.
The logic process with using salt water is always to put MORE salt in than needed, but this can be very drying on your skin, and if salt crystals form when the solution dries, they can be dragged into the piercing and have a sandpaper effect (ouch!)
How to fix it: Saline. Saline. Saline. You can get it from your piercer (usually) and even on amazon (Stericlens or Neilmed are both available on there). Other than this – clean, warm water is the only other thing that should touch your piercing. Your body will do 90% of the healing, the other 10% is up to you and saline/warm water. Strong chemical-based antiseptics (TCP, surgical spirit and tea tree, lavender oil, etc should NOT be used).
Poor quality jewellery and/or inappropriate size/type.
Metal allergies aside (some people are allergic to some metals, which are perfectly safe to pierce with if you AREN’T allergic) the surface finish/polish, metal grade and thread type of jewellery all contribute to the ‘quality’ of the jewellery. Jewellery quality could be a whole other blog, so I’ll keep this section as brief as I can. See my blog on jewellery materials here: http://skinseamstress.com/wp/2021/04/09/jewellery-materials/
If the jewellery surface isn’t smooth and polished, it can have a sandpaper effect on the piercing channel, bacteria can also hide in those little scratches. A textured surface has a much higher surface area and is harder to keep clean. So, rough/textured surface = bad.
Not all metals are equal – implant grade titanium/niobium and 14kt gold (or higher) are the most commonly used metals in initial piercing. ‘Surgical’ Steel is also often used, however in Europe, we aren’t allowed to use anything that has a nickel content over a certain level (most surgical steel jewellery has a nickel content – so we save it for use in healed piercings ONLY for simplicity).
I have seen clients who tell me they have an allergy to titanium, but when we look at jewellery they have worn, its possibly the surface finish that caused the problem, or a low grade of titanium (which is TECHNICALLY titanium, but it isn’t suitable for use in body jewellery). When we have switched to an appropriate grade, with a smooth finish, there’s no allergy symptoms and the piercing recovers well.
As for size… When piercing, the jewellery fitted is of a longer length (in studs – straight or curved bars) or a larger diameter (in rings/’round ones’) to allow for the anticipated swelling. Any time you break the skin, it will swell (think of something superficial, like a papercut or cat scratch – the skin will puff up a little around it, but it will go down quickly). In a piercing situation, the swelling can stay there a bit longer (quite a bit longer) because your body has to heal around the jewellery, which takes more effort/time. If we pierced with perfectly sized jewellery for un-pierced anatomy, the swelling caused by piercing will mean the jewellery is too tight and could embed (where the balls or ring sink/cut into your body) – this can be super painful and cause a lot of damage. So, we use slightly larger jewellery to stop this happening (side note: sometimes, more swelling than expected is present, so an even longer/larger diameter piece of jewellery may need to be fitted). Once the swelling has gone down, the jewellery can be ‘downsized’ – meaning a shorter/smaller diameter piece is fitted. This is usually done between 1 week and 3 months (depending on the piercing). The piercing may not be fully healed at this point (return to your piercer for this – it’s so much easier than trying yourself).
I know I am getting away from the point.
SO! When the swelling goes, the jewellery is now ‘too long’ or ‘too big’ and this extra length/diameter WILL cause movement, which equals irritation, which equals lumps/bumps (see above). This is why downsizing your jewellery is so important.
Jewellery type can play a part too. Some piercings heal a LOT faster when certain jewellery is used. Nose piercing is one of the best examples of this – rings are best kept for healed nose piercings. It’s not that no one has EVER healed a nose piercing with a ring, but generally they cause more problems and result in a longer healing time – the rings move a lot more than studs (movement again…) and can be harder to keep clean. Your piercer can advise you on this – but remember, body jewellery can be changed. If you want to wear a certain piece, it will be possible when it heals, you aren’t stuck with the same piece forever, but getting the piercing healed and happy is our (piercers) priority! Larger/more ornate jewellery (attachments, rings, etc) is much harder to keep clean, and more likely to snag on clothing etc (yes, movement again). Things like ornate jewellery and clusters are perfectly safe to use in new piercings BUT they can get caught more easily – so if you’re having trouble healing it, maybe try switching to a smaller/simpler attachment and then pop the cluster back on once downsized/healed. The general rule is that the simpler and least fussy jewellery styles do well in fresh/healing piercings, and fancier, more ornate pieces are best kept for healed ones.
How to fix it: This one is a tricky one, as there are a lot of factors with body jewellery. Jewellery quality – ask your piercer to switch it for a good quality titanium or 14k gold or niobium piece, with a smooth finish (these materials mean a lower chance of an allergy). Size… The movement of the larger jewellery irritates the piercing, which causes a lump to form (and/or the area around the piercing to swell) MEANING that the jewellery is NOW the correct size, to allow for this extra swelling. The jewellery stops moving, so the bump/swelling go, but now the jewellery is too long again and this causes movement again, which causes irri…. Ok, you get the idea. Getting stuck in this cycle can be hard to break, wait until the piercing is on a ‘good day’ and return to your piercer to ensure the right size jewellery is used – usually halfway through the piercing – a ‘downsize’. Sometimes more than one downsize is required, this isn’t unusual. Style – try something a little simpler, which will be easier to keep clean. Keep your beautiful, fancy piece safe, and it can be re-fitted in its rightful place once you’re all healed.
Not drying the piercing thoroughly after cleaning.
This is another really common one. Moisture on a wound rarely results in anything good. If a deep cut is left wet, scabbing can go soggy, and the wound can reopen. If stitches get wet, the skin can soften and the stitches can pull through, re-opening the wound. It would be impossible to never get a piercing wet while healing, but if (when) it gets wet, you MUST dry it. Drying the area and keeping it dry as much as possible will really help your piercing heal.
Your piercing should be dried as soon as possible after it gets wet – so this means drying it after all the following: cleaning it with saline, after baths/showers/hair washing and things like swimming, hot tubs, steam rooms, face washing, etc. (side note – swimming in chlorinated water is best avoided while healing a piercing, as this can also cause problems with healing).
Intimate and oral piercings (and the inside of nose piercing) simply cannot be kept dry, but wiping/rinsing away anything you’re using to clean it (saline/intimate wash/mouthwash) and patting the area dry with a clean tissue will help.
How to fix it: It’s hard to get a good look at some piercings, meaning you can’t tell how dry they are. Using cotton buds is good, as they absorb a lot of water, and you can get into nooks and crannies with them, but they can sometimes mean that the jewellery is poked and prodded (back to that movement problem). Scrunching up a clean tissue/piece of toilet roll/kitchen paper (anything clean and absorbent – avoid using a bath towel, etc. as they can hold bacteria) and pressing it onto the area (you don’t need to rub or scrub, the tissue will wick the water away, just press gently, then repeat until the tissue is coming away completely dry) is a great way to minimise movement while ensuring the area is thoroughly dry. Another great way to dry piercings – especially in hard-to-reach places – is using a hairdryer on the lowest setting. The heat is good for your piercing, just be super careful not to burn yourself (remember, metal will heat up!) it’s a no-contact way to dry your piercing and you can use it after using cotton buds/tissue to finish it off. Be aware that if you have wet hair which is then put/combed over the piercing, you’ll need to dry again. Personally, I use either cotton buds or tissue and then finish off with a hairdryer.
Sleeping on the piercing.
This one is hard, because you can’t control what goes on when you’re asleep. So, it’s 100% not your fault! I look like I am break-dancing in my sleep (just ask my other half to show you the bruises all down his side from me wriggling and thrashing around in my sleep!) If it was only possible to heal piercings on the side you DON’T sleep on, people would only have piercings on one side of their body. The issues raised with sleeping on piercings is mainly true of ear piercings, but also noses, lips and nipples too! And people like me – who act like a demon has possessed them – would heal nothing! But there are ways to work around this! Sleeping on a piercing can cause the jewellery to be pushed up/down at one side (instead of sitting perpendicular to the tissue). If this is done on a fresh piercing (when the wound is unstable) this can mean it heals at an angle. While this isn’t the worst thing in the world, it can mean that larger attachments (clusters, etc) will not sit flat, and rings may also look a bit skewed, and lumps/bumps can form. When the piercing has healed, or at least been downsized (see above) sleeping on it usually causes no problems – and once the piercing has fully healed (wound is stable) sleeping on it is fine. But when a fresh/healing piercing is slept on and the jewellery is pushed up/down, lumps/bumps can form – teeeechnically this comes under ‘jewellery being moved/played with’ but this is a very specific thing, and you’re asleep, so this deserves its own section.
How to fix it?: Travel pillows are absolutely ideal for this! Sleeping with your ear in the centre of the pillow (see my poorly drawn diagram below) will vastly reduce the risk of the piercing being slept on – it will also give you the most comfortable nights sleep you have EVER had!
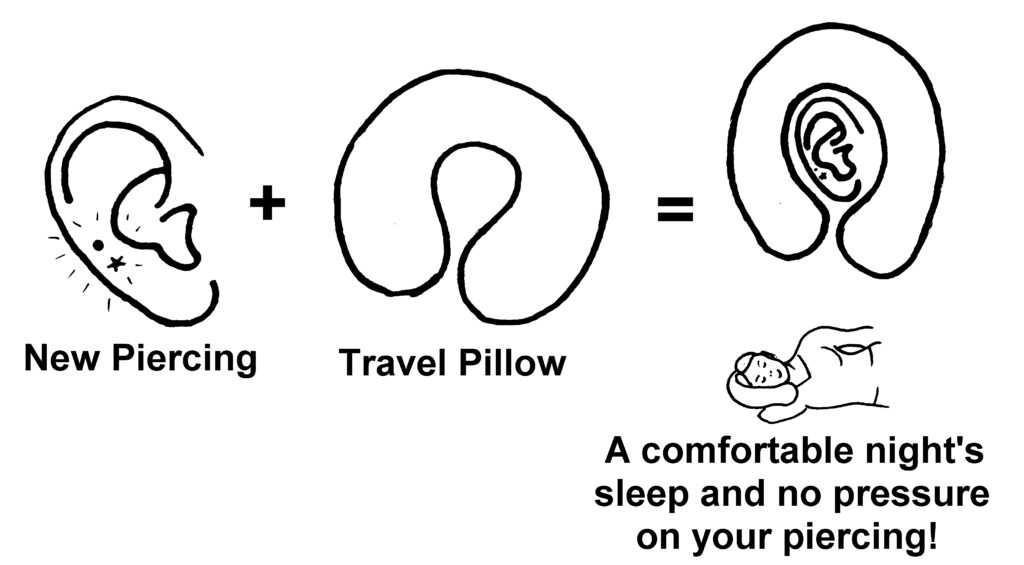
Sleeping on your elbow, with the piercing in the gap, between pillows (again, piercing in the gap) and on your cupped hand will give the same result. I have done all of these, but the travel pillow was by FAR the best thing. Putting the travel pillow inside your pillowcase will mean it doesn’t move around too! (Tip brought to you by the colour purple and Lola at Forest Piercing in Glasgow). Once you downsize your jewellery you can sleep on that side again, personally I find the travel pillow is more comfortable than a standard pillow in general – it keeps my ear cool (no hot side of the pillow), protects my piercings and stops me thrashing around like a shark attack victim.
Make Up/hairspray/fake tan/skin products/other foreign bodies getting into the piercing channel.
It is SO hard to keep all foreign bodies out of your piercing. If it were possible, keeping the piercing in a sterile bubble would eliminate this factor – but as we know, it isn’t possible. Anything ‘getting in there’ can upset a piercing. As mentioned above in the ‘Touching your piercing’ section, bacteria or foreign bodies getting into your piercing means that your body’s immune system has to work so much harder to ‘fix’/’fight’ it. You need to keep any makeup/hair/skin products off the piercing – it doesn’t count if you apply the product and clean it away (sorry!).
How to fix it?: Create a barrier when applying makeup/hairspray – use your hand to cover the piercing when applying either. If using something like powder makeup, wrap your finger in a clean tissue and place over the piercing, apply powder, allow a few seconds for everything to settle, then remove your finger. When using foundation/concealer/fake tan, just start blending a bit sooner than usual to keep it off your piercing (you’re gonna get SO good at blending!) For scrubs, face masks, strong washes, serums, etc. – just avoid that area and rinse well after use (when your piercing is fully healed you can resume your usual routine, but if you get any irritation, just work around the piercing site). With fake tan (this is a side note) it can discolour your jewellery so do take care when applying, or remove the jewellery – if fully healed – before applying and put the jewellery back in when you’re done.
Poor health – being ill, run down, recovering from illness/injury, dehydration, pregnancy.
It’s something we often dismiss (*puts hand up* “Guiltyyyy!”), but your body’s ‘healing power’ depends entirely on your health. Your immune system is an army and if those soldiers aren’t fuelled, rested and hydrated… it can mean that your piercing will not heal in a timely manner. As with an army, your immune system has a finite number of soldiers, and piercings are often waaaaaay down their list of priorities. Repairing your body after an injury or recovery from an illness will take priority over healing your piercing. Side note – health issues (such as diabetes) can mean a slower healing time – not necessarily lumps and bumps, but any long-term health issues can impact it.
Staying hydrated, resting appropriately and having the right nutrition will put rocket boosters on your immune system (she says, having eaten a vegetable earlier this week, and drinking a glass of water yesterday and wondering why she still has a snotty nose). Healthy body = healthy piercing!
Recovering from an injury/illness (I’m looking at you, Covid!) can mean a longer healing time too. Your immune system is AMAZING and will prioritize things like ‘repairing broken leg’ and ‘dealing with throat infection’ over ‘healing little hole in my nose’. Again, your immune system has a limit and if it reaches that it will prioritise more urgent things (recouperation after being ill, recovering an injury, healing a larger wound, etc.) over a small puncture wound (i.e., a piercing). That’s how it is. Sorry. Its worth noting that if you’re put on antibiotics for an unrelated (to your piercing) issue, you will see an improvement, but when the course finishes, it backs up on the healing and needs more time to heal. More side note: (this blog has more words than my university coursework) you should ALWAYS finish any course of antibiotics given, ‘winning over’ an infection can take time, and just because it feels like it’s better, it doesn’t mean it’s done!
Pregnancy is another huge thing your body can go through, and as we all know (or should know) we don’t just get an email when this happens… “Hey Gurl! Congrats, you’re pregnant! Here’s 10% off at Mothercare” (is Mothercare still a thing?) it can be 4-8 weeks before we even have a clue. I have had clients contact me in a panic because they got pierced a week ago and have just found out they’re 8 weeks pregnant. I have a separate blog on pregnancy here: http://skinseamstress.com/wp/2021/05/11/pregnancy-body-modification/ but aside from that, your body is building a tiny human and DEFINITLEY has more important things to do that dealing with your ear piercing. This doesn’t mean you need to remove the piercing but it does mean you’re gonna need to deal with it kicking off until the little one is here, and your body can re-prioritise it. Keeping baby safe is your priority right now.
EXAMS (the devil’s pastime as Mama Seamstress calls them – she is a school counsellor in a secondary school) – you will not believe the number of people I see April to July with piercings that have previously been fine and have suddenly started being sore, getting lumps/bumps, etc. This situation will apply to any stressful situation (moving house, planning a wedding, and simply ‘going through some shit’). I will never tell someone to just “try and be less stressed”, it isn’t that easy, but when the ‘major life event’ goes, the issue with your piercing will too. Just work through it as best you can, and know that red bull and crisps is not an appropriate diet.
How to fix it?: Self-care. Allow your body to rest (get plenty of sleep), drink plenty of water (staying hydrated) and make sure your body has enough ‘fuel for this ‘army’ – eating well, taking multivitamins (zinc is essential for a healthy immune system). It’s very easy for someone to tell you to de-stress and relax, but when you are ‘in the mix’ it is hard – temporary stress, such as a house move, job change, exam season… you’ll find that your piercing recovers when that temporary stressful period is over. Just ride it out, but know that this is your body’s way of asking for some help. Listen to it, take a multivitamin, have an early night, drink some water, eat a vegetable.
How can I tell if these changes have helped?
Lumps and bumps can take a while to go (weeks or months usually), yet they come up overnight! When a lump appears, I usually recommend clients take a really clear pic of the piercing (lump/bump included), then implement the changes they need to make (see above, and figure out which applies to you), and take another pic after a week-10 days of looking after it as above. It’s hard to tell if it has improved just by looking at it every day (a bit like when you get a puppy and your friend sees them after a couple of months and will comment how big they are getting, but you see them every day, so haven’t noticed – until you see an older photo of them, and realise they have grown!) When you see an improvement (piercing looks less red, bump has shrunk, area looks drier) you KNOW whatever you’re doing is working – and this will give you the encouragement you need to keep doing it.
As with any piercing related issue, return to your piercer for advice/a check up if you’re concerned – leave your jewellery in, and always be prepared for a temporary change in jewellery (remember, you can switch back once healed) and always be honest – we’re not gonna shout at you if you have a bad habit of twiddling with it, we just need to know what’s happening so we can help.
SO, I SAW THESE NO-PULL DISCS..?
They can help SHORT TERM but they treat a symptom, not a cause.
For those of you not in-the-know – No-Pull discs are flat silicone discs with a hole in the middle, they fit onto bars/labret studs (I’ve never seen them working on rings!) and compress the ‘bump’ (meaning they fit onto the bar/stud that is in there at an appropriate length due to the stud – see jewellery size above – being a longer size for a swollen/lumpy piercing).


Compressing the lump/bump will encourage your body to re-absorb the collagen (scar tissue), meaning the lump/bump will go down BUT if you don’t treat the source of ‘irritation’ (all the above), then when the no-pull disc is removed, the lump/bump will re-emerge. I have seen success with the no-pull discs, but ONLY when the jewellery is downsized and switched for an appropriate quality. They are not a magic wand, simply a helping hand!
Anything I Should NOT Do?
Don’t believe everything you read online. Much of the advice is questionable at best, dangerous at worst! Home remedies like essential oils, strong astringents and one that many people know of, making an ‘aspirin paste’ and applying it to the area are NOT reccomended. You can cause a lot of damage, and using a medication in a way that it is not designed for can be very dangerous.
Removing the jewellery is a way to get the bump to go – but it also means your piercing goes with it. This is absolutely an option (and your piercer can help you remove the jewellery), but this isn’t the only option.
**TL;DR**
It’s almost definitely not a keloid.
Stop touching it and moving it (this is a hard habit to break).
If you caught it on something, it will settle back down, just keep it clean and dry.
Clean your piercing no more than twice daily, dropping down to once a day after a couple of months.
Use ONLY saline or clean warm water to clean it.
Make sure your jewellery is appropriate (downsizing is important!)
If it’s a nose piercing and you’re wearing a ring, you need to switch it to a stud TEMPORARILY.
Dry it THOROUGHLY any time it gets wet.
Use a travel pillow to prevent sleeping on it.
Make sure you are keeping makeup and hair products away from it
Stay hydrated, eat well (food = fuel for your body’s immune system) and get plenty of sleep.
DO NOT use any products, oils, pastes, creams or ointments on it. While this may provide short-term results, it can damage your skin and the piercing.
Return to your piercer if you’re worried or want a check-up, and monitor the piercing by taking a photo once a week to see how it improves with the above.
Further Reading
I’m including links to other blogs on the subject because many piercers can put things FAR more eloquently than I can!
Rogue Piercing (Nottingham): https://roguepiercing.co.uk/2019/10/19/high-quality-part-12-lumps-and-bumps/
Pictures of Lily (Bedfordshire): https://picturesoflily.co.uk/lumps-bumps-piercings/
Piercings By Tim (Northamptonshire): https://www.piercingsbytim.co.uk/blog/lumps-and-bumps
Lynn Loheide (Seattle, USA): https://www.lynnloheide.com/post/moisture-irritations-on-earlobe-piercings
Lynn Loheide (Seattle, USA): https://www.lynnloheide.com/post/a-comprehensive-guide-to-piercing-bumps