
Lots of you will have seen stretched piercings before, and I’ve put this blog together to help those of you who want to stretch your piercings and need advice on how to do it, as well as for those of you who’ve already got stretched piercings to give you some tips on tricks on how to get the most from them, and how to avoid – or fix – any issues.
Most of the time, people stretch their earlobes, but it is possible to stretch any piercing. It is also quite common to see genital, septum, tongue and lip piercing stretched. Nipple, navel, nose and other ear piercings can also be stretched, but it is less common.
I will mainly be referring to earlobe stretching in this blog, but if you would like to see something discussed in more detail, please let me know. Or you can call into the studio and I’ll have a chat with you!
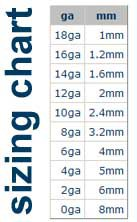
OK, so when you are 1st pierced it is usually at a relatively small thickness – most commonly 1.2mm or 1.6mm (intimate piercing – particularly a Prince Albert – is usually done at 2.4mm and above) in America, they use a numbered gauge as a size guide, which we are slowly adopting over here too – but we usually stick with millimetres for larger gauge. Here is a chart that shows the gauges against millimetres. I work in millimetres for the most part, but do let me know if you need your gauge writing down too – if buying jewellery online, some webshops use one or the other, and some use both.
How Do I Get Started?
Wait for the piercing to FULLY HEAL before stretching. Stretching a still-healing piercing is asking for trouble. If you know you are planning on stretching your piercing, tell your piercer your plans and ask for it to be done initially at the largest gauge/thickness possible. This saves you time and money!
If you’re planning on stretching an existing piercing, check that the piercing is in the correct position and that it is straight. If it isn’t in the right place, stretching it will make it look even more off-centre. If it isn’t straight (if the front of the stud is higher on your lobe than the back), stretching it will mean that the back of the jewellery will hang lower and possibly even make the underside of the lobe – the bit pointing towards the floor – get smaller and smaller.
Think about what size you would like to have the piercing once it is stretched. I know from my own experience that you get to your ‘planned’ size and then go even further, however if work/school are going to protest, it may be worth checking what size would be acceptable before you start.
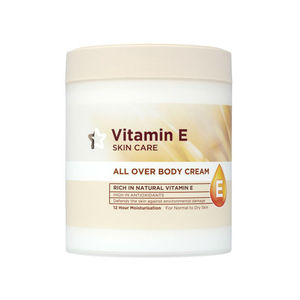
Massage your lobes daily. Massaging will help the blood circulation in your lobes. Do this for a few weeks before you stretch up each time. Personally, I massage my lobes daily, even when I’m not stretching, as I find it really helps keep my lobes in good condition. Using a vitamin E cream/oil, or an unfragranced body lotion works great, as well as specially-for-lobes products, like jojoba oil or Holey Butt’r. The skin is unbroken, so you don’t need to be too particular about what you use.
This vitamin E cream from Superdrug is an ideal easy-to-obtain product for massaging your lobes with. It will give your skin more elasticity and improve its condition. It’s relatively cheap, non-greasy and non-fragranced. I love Superdrug own brand as it is all cruelty free, and the majority is vegan. This is what I use personally, but there are a lot of other products available.
The chart with sizes on (above) shows the order you should stretch your ears to, working down the chart. I have found from personal experience that after 4-6mm it is possible to stretch up 2mm at a time. However, if I am stretching a piercing for someone else, I do not like to go up more than 1mm at a time. I will only stretch piercings on people aged 18+. I will sell jewellery and stretching tape (see stretching methods) to people under 18, but will not fit it.
Is There Any Way I Can See How It Will Look BEFORE I Stretch?
Sometimes, if you’re unsure about how a stretched piercing will look (or if work/school aren’t happy with stretched piercings), you can fake it! A 1.2mm or 1.6mm piercing isn’t very obvious, and most people will not notice it, so you can use a 1.2mm or 1.6mm ‘fake plug’! These will fit ‘regular’ piercings but look like a stretched piercing (example below).

OK, I’m Ready To Do This! How Do I Get Started?
There are four main ways of stretching your piercing, only two of which I would recommend. Most people find their own favourite or use a combination to get to the desired size. When you first start stretching, it’s best to get a professional piercer to get you through the first few millimetres (see option 1), watch what they do, ask questions and listen to advice given, and then you can give it a try on your own when/if you feel ready. The rule of thumb for stretching is “a millimetre a month”. Meaning you should leave a minimum of 1 month between each size (2 months if going up in 2mm increments) but this will vary from person to person and piercing to piercing, but the longer you can wait between sizes, the better (easier and less painful!). IF IT HURTS PAST THE POINT OF MINOR DISCOMFORT, YOU ARE DOING IT WRONG OR TOO FAST. Try going up in smaller increments, waiting longer between stretches or try a different method.
1 – With metal tapers, straight up by 1mm (available from me and most other professional piercers).
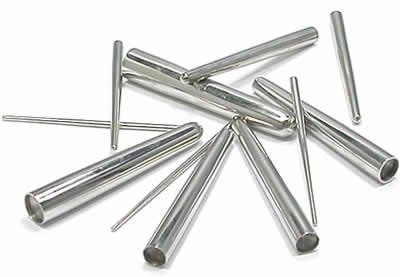
This will usually be done at 1mm increments. The jewellery you have in is removed, the piercing area and new jewellery are cleaned, then a sterilized (autoclaved) metal taper is gently pushed through your piercing (with lubricant) and the new jewellery follows it. I ask customers to buy the jewellery from me at the size they will be stretching to (so I know it’s of acceptable quality, and so I know the correct size is being used). If you’re unsure what size you are at or what size you should be going to, ask your piercer. I charge a small fee for a stretch PLUS the cost of the jewellery. The 1mm stretch is done in one go and is relatively quick and will only leave a ‘tight’ feeling for a few hours. Only available to people aged 18+, as this is a body modification procedure and stretching – using any method – cannot always be reversed easily and is a permanent change to your appearances (will cover this more later in the blog). This is what the metal tapers look like (different sizes):
Advantages: Quick procedure, not too painful. Can be used on all piercings.
Disadvantages: You need to visit your piercer regularly to get this done, can be more expensive than other methods.
2 – ‘Taping’ using stretching tape (DIY method – tape is available from me).
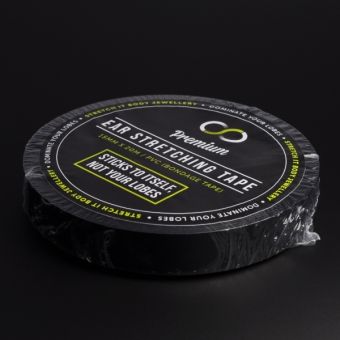
This is MY preferred method, and how I stretch my own piercings. Get some jewellery at your current size (a 12mm long barbell or unflared plug/tunnel – see below for jewellery types – is best). Make sure you clean your piercing and jewellery thoroughly before starting. Best done after a hot bath or shower, clean and dry your existing jewellery and wrap 2 layers of stretching tape around your plug/barbell, then insert it as normal, using a bit of lubricant – or vitamin e cream. If it won’t fit, unwrap some of the tape until it will. Add 1-2 layers of tape every 3-4 days and start testing with your next size after 6-8 layers.
‘Stretching tape’ (shown below, and available from me) which is like bondage tape (ideal because there’s no adhesive) is my favourite, and the only thing I recommend. I have seen people use medical tape and electrical tape (the adhesive has been known to cause allergic reactions – doesn’t happen as much with medical tape as it’s designed to be used on skin, but medical tape is often porous and textured, so pros and cons to each).
Advantages: VERY gradual, so next to no pain, can be done at home, brilliant for tricky areas like ear cartilage because of how gradual it is. Can be used on most piercings, relatively cheap.
Disadvantages: Can get a bit stinky, and you need to buy new jewellery (unflared plug/barbell) in the next size up before starting. You can buy ‘piercing deodorant’ to help the stink. See later in the blog for care products.
3 – DIY with acrylic or steel tapers. I don’t recommend this method as much as the previous two; or at least not until you have had some experience with stretching.
Definitely the most popular method, but the danger with using these is that a lot of people do too much too fast. The tapers pictured below would stretch from 2mm to about 6mm which is much too large to do in a single stretch. I know people who have done it, and I get told often “Well my friend went from 1.6mm to 6mm in a week, and his was fine” but it just isn’t sensible. Just because you CAN, doesn’t mean you SHOULD. There is also a temptation to share tapers with your friends. This is not hygienic and acrylic tapers cannot be sterilized. If you are at 4mm, it would be OK to use the 2mm-6mm tapers to get up to 6mm. If you DO go down this route, please do NOT leave the taper hanging out of your ear after stretching. Replace it with an appropriate piece of jewellery at the correct size as soon as possible (usually possible after a few days, as long as it all feels OK). The acrylic tapers are NOT suitable for long-term wear. I have tried this method myself, but I didn’t like it and found it painful and awkward. For this reason, I do not sell tapers in the studio.
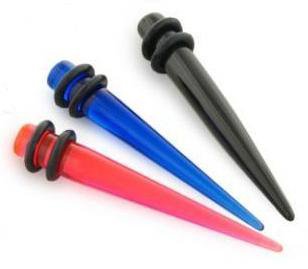
Advantages: Cheap, easy to get hold of, can be done at home.
Disadvantages: Easy to go too fast, can be painful, unhygenic, slow method. You need to buy the taper AND the plug/jewellery to insert once stretched. If you aren’t clued up, you can do some serious damage.
3 – Old skool method. I don’t recommend this method, though many people have had success with it.
I have used this method myself for my earlobes (it isn’t really suitable for any other piercing), and while it worked for me, I DO NOT recommend it. The only reason I mention it here is because it is a method that can be used. It can be awkward and take longer to heal (so leaving longer between sizes is essential); it can also cause swelling and a lot of pressure around the piercing. To do it, simply put as many barbells/BCRs (as well as the plug size you are currently at) through your piercing as you can.
When I started stretching my ears (I think it was 1998 when I first stretched them… showing my age there!), larger gauged jewellery was not as easy to come by, and once I got into the habit of just putting as much through my lobes as I could, I just kept going as it worked. The pic below shows my ear with a 28mm clear PMMA plug and two 4mm PMMA BCRs. This lobe went to 30mm after 2 days of this. PMMA – the plastic stuff – is much lighter than metal, and the jewellery is usually cheaper – so it’s great for use when stretching, but always make sure you use a suitable, inert plastic like PTFE or PMMA. Plastics are not suitable for long-term wear.

Advantages: Can be done at home.
Disadvantages: Really only suitable for earlobes, can be expensive having to buy extra jewellery, can cause pressure points and thin your lobes, easy to do damage if you don’t know what you’re doing. Can be painful.
So…. Is This Gonna Hurt?
Short answer: A little bit. Stretching your ear (or any other body part) is going to cause some discomfort. If you find it too painful, try stretching by smaller increments, or leaving longer between stretches. If it REALLY hurts, you’re doing it wrong! You will feel a ‘tight’ feeling or a warm sensation, almost like a minor friction burn, but no real pain. DO NOT use ice to ‘freeze’ your ear to numb it. Cooling it will cause the skin to contract which will make it even harder to stretch. Freezing it regularly will also reduce blood flow to the area, which will make it harder for the piercing to heal. Stretching is usually easiest after a hot bath or shower (so the exact opposite of cooling it!)
You usually notice the area will feel tight immediately after stretching (I always feel like I need to push the underside of my lobe up, against the plug/jewellery when I first stretch it) and this may continue for a few hours. Keep the area at a constant, warm temperature to help circulation and try not to fiddle with the piercing. Treat a freshly stretched piercing as you would a freshly done piercing. Unless it is very painful or uncomfortable, leave the jewellery in. If you feel you have gone too fast, and/or there’s a great deal of pain/discomfort, put your old jewellery back in (going back a size), and try again after a longer period of time. See later in this blog for info on what to do if things go wrong!
Most people (myself included) find the first 8-10mm of an earlobe stretch the hardest, after that it gets much easier. If you try one of the methods above and find it painful or difficult, try a different one. If you’re ever concerned about your piercing, or want some advice, STOP STRETCHING and consult your piercer.
I’ve Decided On Which Method I Want To Try, How Often Can I Do It?
I am a firm believer in knowing your own body. I just “know” when my ears are ready to be stretched again (no discharge, no pain, able to sleep on the piercing without discomfort, jewellery can be easily and comfortably be put in and out). All in all I recommend waiting at least 1 month between 1mm stretches, though you get to know what your body will and will not take. It sounds a bit new-age, but listen to your body, and if you’re unsure, wait a little longer before attempting another stretch, and never stretch during the colder winter months. After putting larger jewellery in, ideally you want to wait at least a week before taking the jewellery out, or you risk not being able to get it back in and having to start from the last size you were at and work up again. If you take it too quickly, things can go wrong.
Here is an account from a girl on www.bmezine.com.
Kati started small, and slowly stretched up to 00ga using lubed tapers and slow progression. After that she started stretching by wrapping more and more electrical tape around her jewelry (that’s how I stretched as well), and at six months in she had reached 5/8″. Then she sped things up, adding a bit more tape every day or two.
“It soon became an addiction. After I got to an inch, I would be gauging my ears every day. This was especially bad because my boyfriend had ripped my gauge several times, and it would fall out during the night or during the day, and even at shows, which was the worst. Even through all the stress I was putting on my ears, I was so excited and desperate to have the biggest ears around that I kept going.”
“My ears started to thin out big time, but my ears were so healed they wouldn’t gauge down and — of course, stupid me — I kept gauging them up because they were so healed that they would fall out if I didn’t, and because it was tape, there wasn’t any flaring to keep them in place. I tried to put vitamin E oil on them, and it worked for a while, but then scabbed up and fell off and they got even smaller. Eventually they were so thin, that I was in class and I just had to go to the bathroom and take it out.”
The picture below accompanied the article.

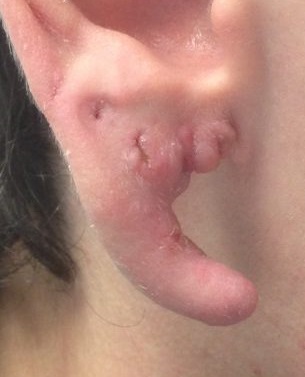
Here’s another pic which looks like the person in question has either gone up too fast and/or had an allergic reaction to the jewellery. Keeping the piercing clean is also a must. You should treat a freshly stretched piercing like a fresh piercing.

I’m not putting these pictures up to scare anyone, merely to illustrate the importance of taking it slow and looking after your piercings. I have seen a lot of people who’ve gone too fast and it’s damaged the piercing in the long run, meaning they can’t go as big as they’d hoped. Your ears will still be there in a month, so give it some time and ENJOY the process.
What Should I Do If It Goes Wrong?
HOPEFULLY you will never need to use this info, but I’m putting it out there in the hope it helps someone! If you run into issues while stretching OR at any point (problems can arise even long after stretching, and seemingly without any provocation!) the following information will be useful.
‘Issues’ can include: pain, bleeding, swelling, dryness, itching, redness (though on a fresh stretch, it can look a little pink for a few days!) and a tight feeling (again, normal for a few days after a stretch).
Think you have an issue? Follow these steps!:
Firstly, don’t panic. Yes, it sucks, but its fixable! Before you do ANYTHING ask yourself “what might have caused this?”
If you’ve recently (in the last month) gone up a size – it’s likely to be that. Take ACTION asap.
If you have been at this size for a while:
*Have you recently changed your jewellery? (Could be an allergy? Pop your old jewellery back in and see how it feels after a day or so).
*Have you slept on it? (I recommend taking out jewellery to sleep in if possible – especially at larger sizes, but only do this if you have been at this size for a month or more).
*Has it been caught on something, or pulled? (Might be worth giving it a day or so to see if it feels better).
If it starts to improve after 24hrs, monitor closely, and leave your jewellery in, but if it doesn’t improve, or gets worse, take ACTION asap.
ACTION!
Remove the jewellery. This is absolutely essential. No one likes to have to go back a size, but truly this is the only safe option.
If you can get the next size down in there EASILY then put it in (I recommend keeping ALL your old jewellery for emergencies such as this!) If it won’t go in, try with the NEXT size down.
If you can’t get any jewellery in, continue to follow the steps below, but try daily to get a piece of jewellery in – again, try with smaller and smaller jewellery until it fits. Use a piece that you haven’t had any issues with to be sure it’s not a piece you are allergic/sensitive to. Ideally, we end up with SOME jewellery in – even if it is several sizes smaller than when the problems first kicked off.
Is there any blood? If so, use a clean and dry tissue (avoid cotton wool, as fibres can stick to the wound) to dab the area, apply GENTLE pressure until it stops. You may be able to see a scab/dried blood – do NOT pick at this.
If there was blood, keep everything dry as much as possible – do NOT soak it in the bath/shower, just give it a quick rinse with warm water once a day, and then dry thoroughly with a clean/dry tissue. You could use saline to clean it too, but clean water is enough. Drying is the most important thing here to get that scab healed.
If there was no blood, you don’t need to use anything like saline to clean it (with unbroken skin, there’s no wound, so no need to treat it like one) you can use a light moisturiser (vitamin e cream as mentioned at the start of this blog is ideal) and gently apply once a day – use sparingly. Wash gently with warm water once a day, you can use an antibacterial liquid soap (gently lather up and rinse thoroughly) if you want to. Always dry thoroughly – I finds applying cream after baths/showers helps.
Hopefully you will see an improvement quickly (within 24hrs), if not, you may need to go down another size – or potentially keep the jewellery out altogether. Again, this sucks, but it is the only safe option.
When your piercing has recovered, you CAN stretch it again – if you have gone down a size or more, this is good news for you! Make sure you give plenty of time and monitor it closely. Stretching up after downsizing is usually a little easier.
Worst case scenario, it closes up completely, and you have to start again…. But that may not actually be the worst-case scenario (honest)….
There is always a chance that your lobe could split – this is more common to see at larger sizes but is not unheard of at smaller sizes!
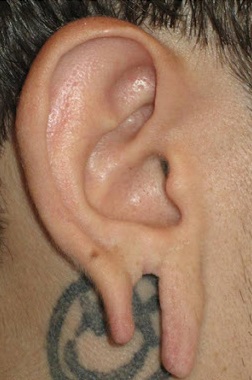
When this happens, reconstruction is the only option. This is something that has to be carried out by a plastic surgeon and is unlikely to be available on the NHS. This can be very costly and lobes may not look ‘perfect’ even with the best surgery. There are body modification artists that offer this; however this is not permitted in the UK (Google ‘Mac McCarthy’ for info – Mac was an accomplished and competent artist who was – sadly – successfully prosecuted in 2019 for carrying out these procedures). I now recommend people seek out body modification artists overseas for the procedure, in this piercer’s opinion, better results are achieved via body mod artists – not plastic surgeons. I recommend Chai at CALM in Sweden for this. Other artists are available, please ask to see portfolios before committing to a procedure.
After reconstruction, it is possible to re-pierce, but you have to wait a minimum of 6 months. See later in this blog for more info on reconstruction.
Is There Anything I Can Use To Make It Easier?
You can use a product called “Holey Butt’r” which is a vegan ear balm specifically made for stretched piercings. I stock it and it’s something I will recommend to people looking for some extra special care for their piercings. A little goes a long way, so you do not need to use much to get results. The manufacturers’ website has the following to say:
“Holey Butt’r is the premier ear crème, specifically developed and dermatologically formulated to aid the healing process and maintain supple, healthy stretched ear lobes. This dedicated ear care product contains the perfect natural blend of Jojoba Oil, Soya Butter and Karanja Oil to gently soothe, soften and moisturise damaged and dehydrated expanded ear lobes.“
1, Always wash hands with Simple Cleanser before handling your piercing.
2. Apply a small amount of Holey Butt’r to your lobes
3. Massage lobes for 30 seconds with Holey Butt’r
4. Apply twice a day or as necessary
5. Wash hands again after touching your piercing.
The product comes in a small rectangular tin with a sliding lid (think lip-balm sized) with 10 grams of pale yellow Holey Butt’r. The label has a full list of ingredients on the reverse, and on the front, it states it is a Vegan product – which I know will excite a lot of people, as balms and butters often contain beeswax.
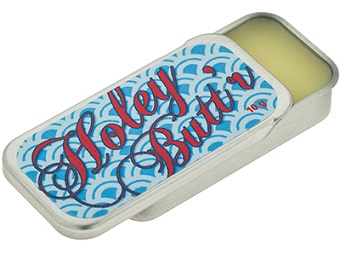
Opening the tin and giving it a sniff, it doesn’t smell unpleasant (I thought it smelled ‘plant-y & green’ if that makes sense!). It has the consistency of greasy lip balm and melts from the heat of your fingers easily. You don’t need to use much at all, massaging the oily balm in spreads it evenly and after 30 seconds of massaging, it is mostly absorbed. I use it once a week, more if I feel my ears need it such as during the colder months of the year.
Other stretching balms are available – such as Stretchy’s Finest, which is also vegan – and offers a ‘sensitive’ care which contains no menthol or camphor (which the ‘original’ does) so is ideal for sensitive skin. More of a cream than a balm, but the same principle of ‘a little goes a long way’ applies. According to the website:
“Treat your stretched ears to the best there is! Stretchy’s Finest was developed especially for stretched ears and as a preparation for the next stretching step. It stabilises the skin of your lobe, assists circulation and stops unpleasant smells.”
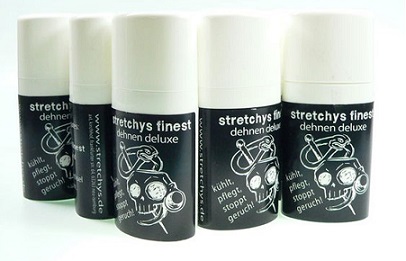
As with any skincare, some people will prefer one or the other, so if one product doesn’t work – try the other! Always check ingredients, and if you experience any irritation from the product, discontinue use immediately.
I stock both Holey Butt’r (10g tin) and Stretchy’s Finest Original – happy to order in the ‘Sensitive’ on request – (15ml bottle), as well as bottles of jojoba oil which is also great for use on stretched lobes.
OK, I’m Taking It Slow And Getting There With It. What Can I Wear In My Piercing?
Lots of different jewellery is available, and different jewellery will feel/look different depending on what size you are at and where your stretched piercing is, and a lot of the reason behind a particular choice is just your personal preference. I can order in any jewellery you need, and I always stock a decent range.
Below are some basic body jewellery types which can be used in any piercing – and can be inserted into a fresh stretch, as long as they are a suitable material (titanium is ideal).
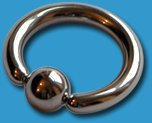
Ball Closure Ring (AKA ‘BCR’)
Sometimes, at larger gauges, the bar screws onto one side of the ring.
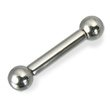
Barbell
Can also be curved – though there are only a small selection of piercings that would require a curved barbell (a navel piercing for example).
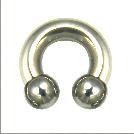
Circular Barbell
Very popular choice as it’s easy to get in and out. Balls screw on either end of the bar.
The following jewellery pieces are suitable mainly for ear lobe piercings, but can be used in other piercings. There are 2 basic types, solid ones (often referred to as ‘plugs’) and ones you can put your finger through (can be called ‘tunnels’, ‘flesh tunnels’, ‘eyelets’ or ‘tubes’)
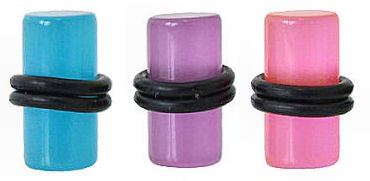
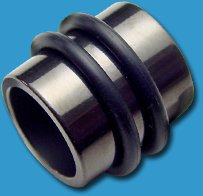
‘Unflared’ Plugs/Flesh Tubes
Usually seen with rubber O-rings on either side. The ones shown are UV plastic/metal, they are also available in other materials, such as glass, and with designs on. Glass versions can be used in a fresh stretch.
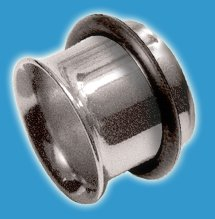
Double Flared Plugs/Eyelets
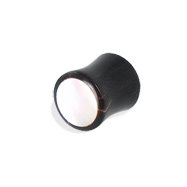
Can be a little tricky to get in and out. Available in different colours and styles. DO NOT use double flared plugs to stretch with, save them for when you are settled at one size. Available in most materials, as well as organics such as stone, wood, etc.
Single Flared Eyelets
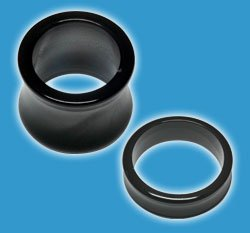
Easier to get in than double flared, usually come with an O-ring. Also available as plugs. Can be used to stretch with as long as they are an appropriate material (titanium/glass).
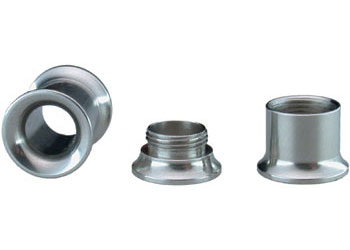
Flesh Tunnels
Various sizes shown, available in different colours and styles. One of the outer ‘discs’ is threaded and can be screwed on and off to make insertion easier, and there’s a much lower chance of your jewellery falling out! Can be used to stretch with but internally threaded (shown below) would be the best option, so the thread doesn’t pull on your skin as it slides through.
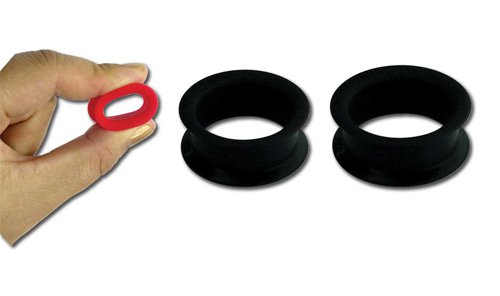
Silicone Plugs/Tunnels
Incredibly comfortable, especially for sleeping in! Available in different colours, as well as teardrop shapes. Make sure you buy a good grade of silicone, such as KAoS brand. Do NOT use these to stretch with, they can cause a lot of damage when used to stretch. I absolutely adore my Kaos pieces.
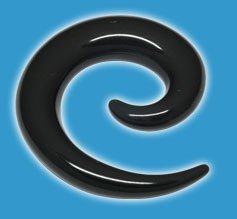
Ornate Ear Jewellery
Various colours, styles, materials and sizes available. Best not used to stretch with – save them for settled piercings.
Ear Weights
An infinite number of styles and designs are available – these are amazing if you have stretched ears but miss wearing ‘dangly’ earrings. You can also wear hoop earrings through your stretched lobes. Weights and hoops can be worn through ‘naked’ lobes – on their own – or through a tunnel, silicone tunnels are a popular choice for this, and my personal favourite. The pair shown below are by Diablo Organics – photo is of @summerhernandez and photographer is @dannzilla (Instagram links). Some people have used weights to help a stretch, but it can be risky, personally I recommend only wearing them in settled stretched piercings, and not constantly.
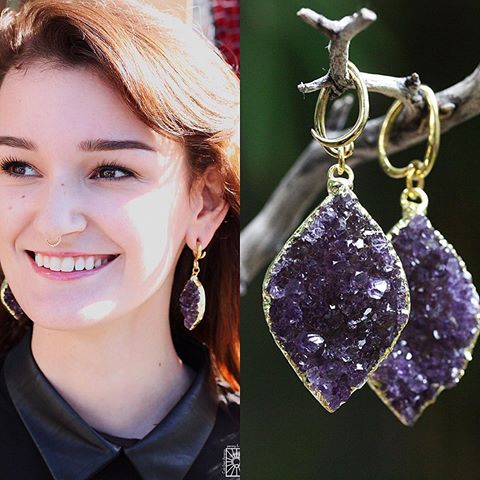
Most of this jewellery is available from your piercer, but for specialist items and for bigger sizes, you may need to look further afield. Most piercers will stock up to a certain size, but happily order in larger sizes. Be aware that the bigger you go (especially past 30mm) you will probably have to pay more for your jewellery and will find that fewer styles are available. Many people will have pieces custom made, but this will cost more. The easiest sizes to obtain are 6-20mm. It’s worth noting that if you stretch your piercing, you will no longer to be able to wear plugs at the ‘smaller’ size – but do keep them in case you ever need them!
I Think I Might Be Allergic To My Jewellery, My Piercings Are Irritated. What Can I Do?
When you first stretch up, it will feel uncomfortable, but if this doesn’t settle after a few days, try some different jewellery, or go back down one size until it settled and then try again. If you’ve previously experienced an allergic reaction to a type of jewellery, try a different material. I am allergic to the rubber O-rings that come with ‘unflared’ plugs or flesh tubes, so I wear them without the O-rings on, or wear alternatives. The jewellery shown above comes in many materials, which fall into 3 main categories:
Metals
Titanium or a good grade of steel are the best types. Titanium is much lighter and contains no nickel, so it’s highly unlikely that you’ll be allergic to it. Steel is much cheaper and you can get fancy jewellery pieces in steel, as they’re cheaper/easier to manufacture. However, there is a higher risk of being allergic to steel as it contains a small amount of nickel. Plus, it is much heavier than titanium.
Plastics/Glass
PMMA is the most common, but PTFE is also used. PMMA is nice and light and smooth, and it’s cheap, which makes it a popular choice for using until you get to your desired size – which is what I used. However, most plastic pieces are simple and other than colour variations, there’s not much to shout about. It’s worth noting that cheap acrylic can leach chemicals into your body with long-term wear… so best avoided. Glass is a bit heavier (and more expensive), but you can get some truly amazing designs in glass. Glass carries no risk of allergic reaction.
Organic Materials
This is the horn/bone/wood/coral/stone/bamboo pieces which are often sourced from natural materials (always check they are sourced sustainably and buy from a reputable retailer. They can be quite heavy, especially at bigger sizes. As they are natural materials, no two will be identical, even if you buy a ‘pair’. The wood and bamboo tunnels and plugs are nice and light and will even stop your ears from smelling funky (you’ll see what I mean as you stretch bigger!) Organic plugs/tunnels are almost always double flared, so are not suitable to stretch with, but are fine to wear in healed stretched piercings. Horn/bone jewellery would not be suitable for vegans/vegetarians, I am happy to order in these pieces, but I do not stock horn or bone. Organic jewellery often requires special care, contact me or see my ‘Jewellery Materials’ blog for more info!
If any piercing – stretched or not – is irritated or causing you discomfort, act sooner rather than later – return to your piercer for a check-up!
What’s That Smell?
As mentioned earlier, stretched piercings can get a bit stinky. This doesn’t mean that anything is wrong, the smell comes from what we commonly refer to as ‘Ear Cheese’ (yuk!) which is a whitish-yellow gunk that builds up on the inside of stretched piercings, the area in contact with the jewellery. All piercings get it (even non-stretched ones), if you have ever left a piercing out for a few hours and then put it back in (or some people who have retired a piercing will squeeze around the old hole) and a little white ‘worm’ will come out of the hole. This is a build-up of dead skin cells, sweat, general bacteria and dirt. Your body doesn’t want to absorb it (very sensible!) so it just keeps it in the piercing until you clean it away. This is why it’s important to clean ALL your piercings, and jewellery, regularly. Once your freshly stretched piercing has settled (at each size as you progress and once it has reached the desired size) wash it daily. You don’t need anything fancy, some warm water and antibacterial handwash will do nicely, and dry/polish with a soft cloth. Remove the jewellery (‘regular’ piercings and freshly stretched piercings – less than one month since going up a size – don’t need to be removed every day, but settled stretched piercings have a larger surface area so more room for ‘ear cheese’ – which is why the smell is more noticeable than in ‘regular’ piercings), wet the area with clean warm water, rub the handwash lather into it, then rub your jewellery with the lather and rinse both the piercing and the jewellery well in clean water, then dry them. I usually do this in the bath or shower and once dry I massage the piercing with Vitamin E cream/stretching product.
There are products available to ‘stop the stink’ – two were mentioned earlier in the blog, Holey Butt’r and Stretchy’s Finest, both work well. Another product on the market is Smelly Gelly which is a balm – similar consistency to lip balm. Unlike Holey Butt’r and Stretchy’s which are all-round care, Smelly Gelly is specifically a ‘deodorant’ for stretched piercings.

It’s ideal for use on septum piercings which will – for obvious reasons – be more likely to give you a whiff of ‘Septum Cheese’ (double yuk!) I stock Smelly Gelly in the studio (8.5g Tub), so if the stink is bothering you, give it a go!
To use Smelly Gelly, remove and clean your jewellery, and clean your piercing. Then, once the piercing and jewellery are dry, use the tiniest amount of Gelly and rub it around the part of the jewellery that is in contact with your skin. Replace the jewellery and make sure its secure. You only need to apply Smelly Gelly once every 2-3 weeks, so a small tub will last you a long time. Smelly Gelly is not suitable for any piercings in/partially in your mouth or on organic jewellery (see above).
Work/School Aren’t Too Keen On It. Anything I Can Do To Hide It?
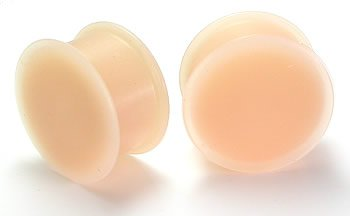
Sometimes, stretched piercings need to be hidden. Skin-coloured silicone ‘hider plugs’ which are available from KAoS can make stretched piercing much less noticeable. They will NOT make it invisible, but as they are hollow and have no back, you can ‘pierce’ the front of the plug and wear a smaller ‘regular’ earring in it which will help disguise it further.
Here are the basic ‘hider’ plugs which I stock. These are of course available in other skintones too!

What If I Don’t Want My Piercing This Size Anymore?
Taking out a stretched piercing can be a little tricky, as you can be left (especially in the case of earlobes) with loose skin, which can get caught on things. A piercing stretched up to 8mm (or less) will usually return to a small, unnoticeable hole – maybe not as small as a ‘regular’ piercing hole, but small enough to not be obvious. Though this will vary from person to person and piercing to piercing. If you are unsure as to whether you will want your stretched piercing permanently, stick to smaller sizes (under 6mm). Stretched piercings WILL shrink down, but only very small gauge piercings (4mm or less) will go back to a pinprick hole. If you have a large gauge piercing, you CAN still have it put back to a tiny hole, though it does involve reconstruction – in 2019 a competent and experienced body modification artist was sadly prosecuted for carrying out this kind of procedure (Google ‘Mac McCarthy’ for more info), and as a result, in the UK this procedure can only be carried out by plastic surgeons. I recommend people seek out body modification artists overseas for the procedure, in this piercer’s opinion, better results are achieved via body mod artists – not plastic surgeons. I recommend Chai at CALM in Sweden for this. Other artists are available, please ask to see portfolios before committing to a procedure.
After reconstruction, it is possible to re-pierce, but you must wait a minimum of 6 months.
The procedure is relatively straight forward, an incision is made either side of the ‘hole’, meeting at the top of the hole, and the tissue is taken out, the two open incisions are then sewn back together. It takes around 30-60mins per ear (larger/more complex ones may need longer, or require a slightly different approach). This is discussed at length in one of my other blogs, so do check that out for a more in-depth look.
Here are some examples of reconstruction results, all are by Chai at CALM.
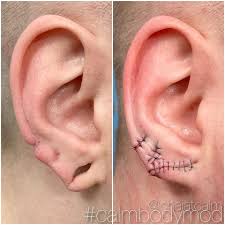
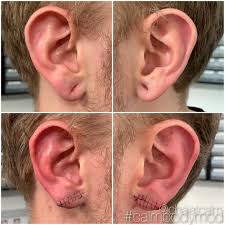
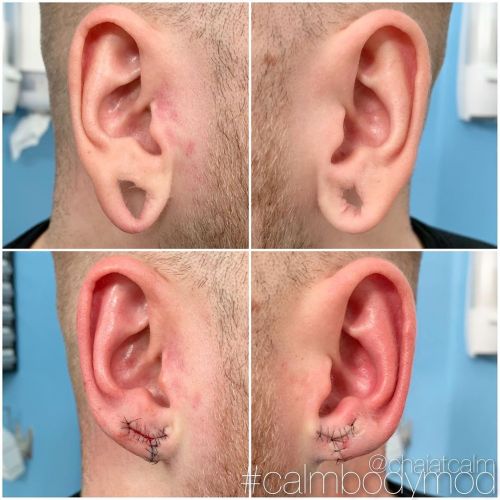
Before considering reconstruction, to help your piercing shrink down, use Bio-Oil (and/or Vitamin E) to massage the lobe and this will assist your skin in tightening up. Wear the lightest plugs you can (PMMA or light organic material such as wood) at a size down from what you are at, just the same way you stretched up, but in reverse! Or just leave out the jewellery completely, but be careful not to get your lobe caught on anything, just go with whatever is comfortable for you.
Here’s a quote from Helen, who shrunk her 6mm lobe piercing:
“I stretched my ear to 6mm and its shrunk quite well, only a 1.6-2mm-ish hole left, barely noticeable… There’s no problem with wearing ‘normal’ earrings. I just make sure to have a rubber back on it if I have fishhook earrings in.”
Anything Else I Need To Know?
Everyone has different experience with stretching piercings. This write-up is a combination of personal experience, common sense and knowledge of how piercings work. Your friend may find stretching easy, and you may find it difficult. This doesn’t mean you’re doing something wrong, just that your body has a different requirement to your friend’s. Some people find that their piercings stretch themselves after a certain point, the main contributing factor is the weight of the jewellery. I have seen lots of people who have never used any stretching methods on their ear after 3mm, and the piercing just makes itself bigger, and every few months, they go up a size. This isn’t common but it does happen. If your piercing is doing this, and you don’t want to go up a size – try leaving the jewellery out overnight and wear lighter jewellery (titanium, PMMA, silicone and wood are the lightest available).
Speaking of overnight – sleeping on larger sized jewellery, especially solid plugs, can be uncomfortable, but once the stretch is fully healed (a month or so) you can remove the jewellery overnight. However, it’s worth ‘testing’ to see how long you can leave it out for before the piercing will shrink a little. A quick vitamin E massage every morning will help get plugs back in. If you don’t want to leave your jewellery out overnight, try some soft silicone plugs or tunnels.
Cold weather, illness or a knock, pull or bump to the area can cause a stretched piercing – even a fully settled one – to kick off a bit. This is normal, but it is sensible to downsize your piercing (just by 1 or 2 millimetres) until you’re feeling better or until the weather is a bit warmer if it feels irritated or tight for more than a week or so. I have another blog up about summer and winter care for piercings which will elaborate more, but it’s sensible to pop some lighter jewellery in for everyday wear, like the plastics mentioned earlier – PMMA or PTFE.
And I think that covers it all!
Stretching your existing piercings is a type of body modification you can do yourself, and it is lots of fun. Enjoy the journey! Anyone can do it and it looks amazing on everyone, which is why it is so appealing and popular. The jewellery range is HUGE and you can use different types of jewellery in multiple stretched piercings to get some amazing effects. Please share your opinions and experiences in a comment!
FURTHER READING: