
One of the most common questions I get asked with regards to microdermals and skin divers is “What’s the difference?” I’ve written this to answer this and a lot of other common questions about ‘Divers’ and ‘Dermals’. This kind of piercing is in the same category as surface piercing – which you can read about here: http://skinseamstress.com/wp/2022/01/12/surface-piercings/
What Are Microdermals And Skin Divers?
Microdermals (AKA Dermals, Dermal Anchors, Anchors, Surface Anchors, Dermal Implants) and Skin Divers (AKA Divers, Mini-Dermals) are two forms of Transdermal Implant. The original Transdermal Implants (AKA Transdermals) look like this:

They were invented and pioneered by Steve Haworth (HTC Piercing, USA) whom we have to thank for a lot of the other more extreme modifications that you see. The ones shown above have 5 holes drilled in the base which circles around the post (which protrudes through the skin). The base sometimes has fewer holes drilled in it (some look like a 4-leaf clover). This is what they look like being fitted:
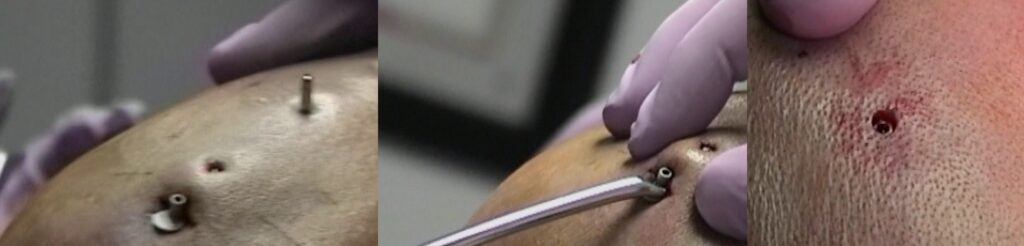
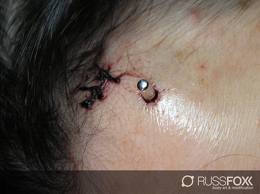
And once they are in (this is one of the most famous – or infamous! – pieces that Mr H has done, on Joe Aylward).

As you can see from the pic of the implant in progress, it’s quite a big procedure. Removing these is also very difficult, as the part of the implant which is under the skin is quite large. You can read about the removal of these larger implants here:
http://wiki.bmezine.com/index.php/Transdermal_Implant_Removal
So, while these implants are versatile and can be placed more-or-less anywhere on the body, they aren’t something that a lot of people could deal with getting done, due to the size of them, costs and not being easy to remove. Then a gentleman called Ben from House of Colour came up with the procedure and body jewellery design for a less extreme concept that would be more accessible, and Microdermals were born! They can be used in the same way as the original transdermal implants (and give the same look aesthetically – but smaller) but their base is more of a ‘foot’ than a plate. They were seen as the answer to people’s prayers after surface piercing proved (generally) to be very difficult to heal (I have another blog up about surface piercing which you may also want to check out, as all 3 types of piercing – surface/dermal/diver – are related). It is worth noting that the original transdermals are still in use, but Microdermals and skin divers are seen much more commonly.
This is the jewellery that I use for microdermal implants. They are made from titanium with a removable ‘top’. There are some minor variations in design among dermals, some don’t have holes drilled (the holes help ‘anchor’ the jewellery in place, as tissue grows through them and reattaches above/below the plate), some have contoured sides and the posts (the part that comes up through the skin) can be different lengths. I use these ones mainly, but on faces and hands, I will use ones with a slightly slimmer base. I offer a plain silver disc – as shown – or one with a clear gem or white opal in as initial jewellery (other styles are available, just ask – this has to be arranged in advance!)
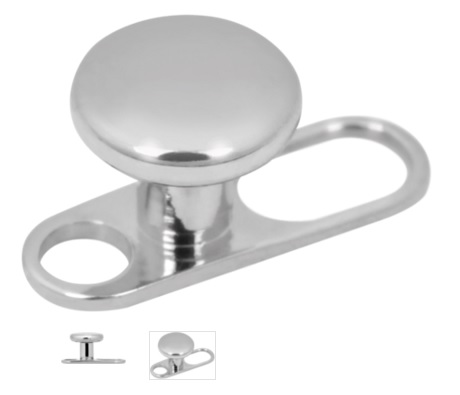
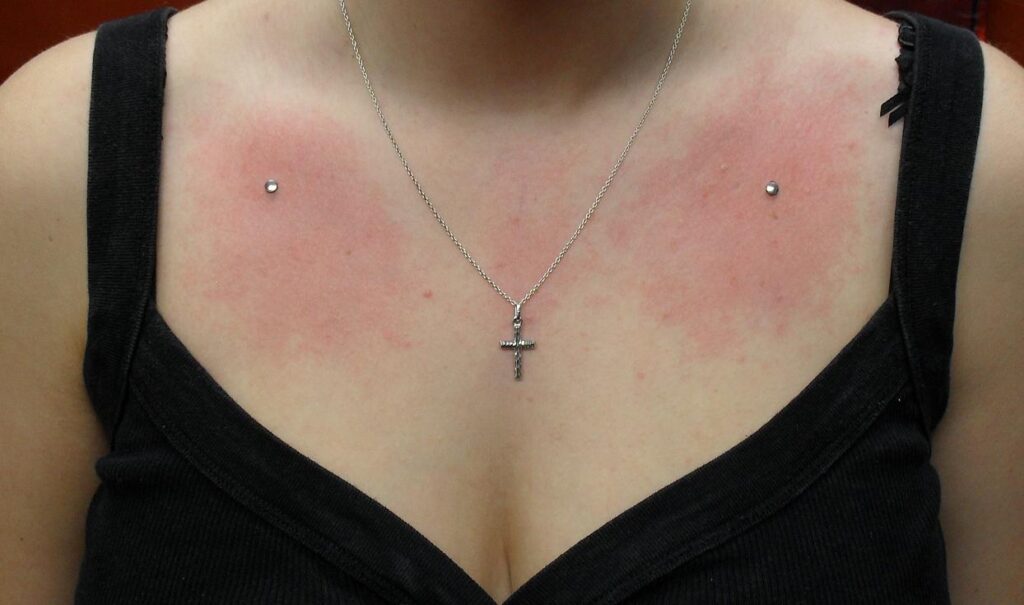
The disc shown on the top is the only part of the implant that is visible once the implant is fitted. This photo shows a pair of Microdermals I did in October 2010.
And a trio on the back of the neck from around 2015

The discs on Microdermals can be unscrewed (though the base of the implant stays in the skin until the implant is removed for good) and changed for other things once healed (discs in other sizes/colours, jewels, opals, spikes, balls, posts, shapes, etc.) This is the main difference between the dermals and divers, as divers cannot be changed. Pic shows a few examples of other ‘tops’ that can be used.
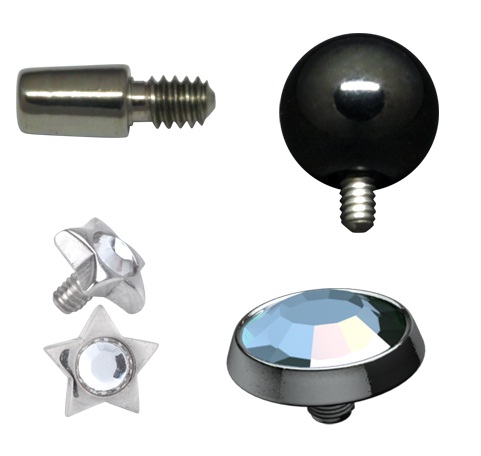
It is important to let the microdermal settle before changing the disc, trauma to the piercing (like moving the skin around it while taking the disc on and off) can cause it to migrate (‘grow out’) but I’ll talk about problems with the piercings later on.
Skin divers are the little sister of the microdermal. They are smaller overall, and the discs on the top are generally much smaller too. Like microdermals, they too are made from titanium. The flat disc is the one visible on the skin’s surface. The slightly conical disc (shown on top of the one on the left of the pic) is under the skin, with the pointed end pointing down (it isn’t sharp at all, just a rounded off point).
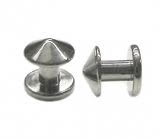
The visible part of skin divers CANNOT be changed. When getting a diver you would be shown all the options that your piercer has available so you can make a choice on which style you would like to go for. The commonest types are the basic titanium circular disc (as shown above) and gemstone disc tops in lots of colours, both of which are available in different disc sizes:

Because they are smaller, skin divers are often used in pairs or multiples to give a more obvious effect, but sometimes less is more and a single dermal looks stunning. This is a row of fresh divers I did in July 2014 (you can see the different colours, baby pink and clear gemstones).

I have seen cases where a diver has been removed and replaced with another (immediately after the first one has been removed) and they have settled, but it is not something I would recommend. I have also seen cases where the gemstone gets tarnished and looks duller over time (this can also happen with microdermals, but the disc could just be replaced with a new one) and this remove/replace method could be an option if you don’t like the duller disc, but there is no guarantee that the replacement diver will heal, even if the one which was removed was perfectly healed. Another problem that comes up quite a lot is with the shaped divers, the stars in particular. The points on the star shaped top catch on a lot of things (threads on clothes, hair, etc.). Please see later in this piece for info about taking care of the piercing, but I felt it was worth mentioning this while looking at the different choices with divers.
There is a third option – not as widely seen or available – ‘skin wheels’ these are a similar shape to a skin diver, with a round base, but incorporate the base holes that are seen in microdermals, so kind of a hybrid of the two. Like microdermals, the ‘tops’ can be changed. However it’s worth noting that microdermal threading (1.6mm internal) is NOT the same as the skin wheels (1.2mm internal), so microdermal tops would not fit, though similar ones will be available in the appropriate size. The procedure is slightly different, the jewellery is placed into the hole (see later in the blog) that was made by pushing down and twisting, corkscrewing the base under the skin. A bit fiddlier than the other two types, and takes a little longer to do, usually, but the healing time/process is the same. From the outside, it looks just like a diver or dermal.
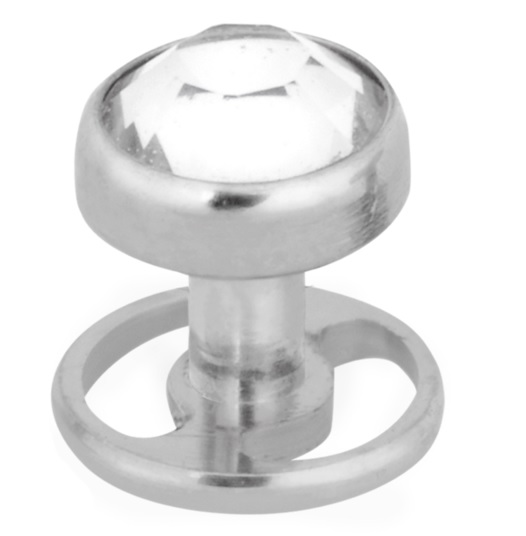
How Big Is The Jewellery?
Not very! The jewellery as a whole is very small, but less than half of it is visible when installed. The visible part of the jewellery is available in different sizes (even though divers have a fixed top, there are a few different sizes available). This shows the sizes of the dermal and diver jewellery against pennies.
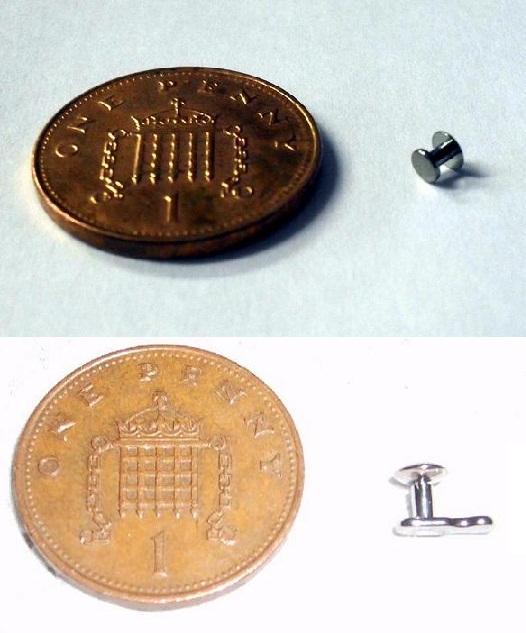
How Are They Done?
The method for both types of implant is very similar. A hole is made on the surface of the skin (this is a single point piercing so there is no ‘exit’ hole) for the implant to go in; a small pocket is created under the skin (the jewellery is often used to create this) and the jewellery is inserted into this hole/pocket.
There is only one method used for skin divers, but microdermals can be performed by one of two methods, the needle method and the dermal punch method (I’ll explain dermal punches in a sec!), both of these are shown below. It is quite hard to explain in words exactly how the whole thing works, but these cross sections and diagrams explain it pretty well.
Microdermal Methods:

- Needle Method: Needle is used at an angle to create a hole and pocket. Often the needle is used to make another pocket in the opposite direction to the 1st (but in through the same hole) to make another pocket for the ‘heel’ of the dermal.
- Jewellery sits between the dermis and epidermis. The red halo shown is the surface area that has to heal to hold the dermal in place.
- Dermal Punch Method: The dermal punch is used at 90 degrees to the skin. It is pushed and twisted about 4mm into the skin (though this varies for different placements). The edge is razor sharp and cuts through the skin easily. It removes a cylinder of skin tissue, then a needle or taper is used to create a pocket (personally, I use the jewellery to create the pocket), which the microdermal slides into. This is the method I use, I feel I have more control with the punch than with a needle.
- This shows the removable part of the dermal. When the disc (or whatever is screwed onto the top) is removed, the dermal is barely visible. A lot of people take the disc of to clean the piercing, but as mentioned above, it is best not to move the disc while the piercing is healing.
Skin Diver Method (pic from www.wildcat.co.uk):
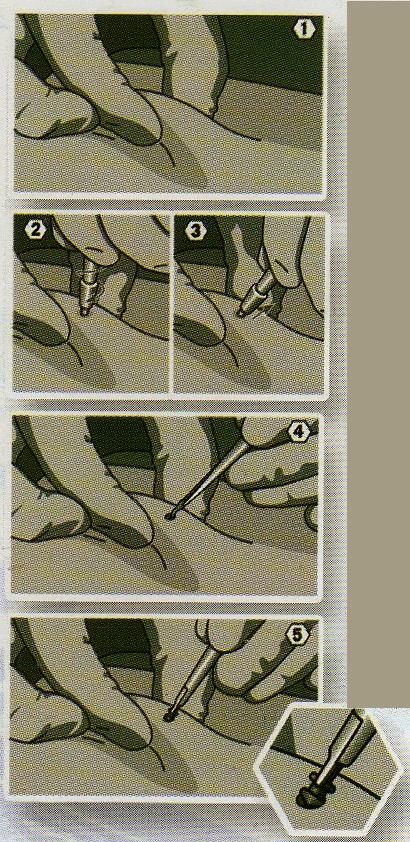
- The skin is pinched up.
- Dermal punch is held at 90 degrees to the skin and gently pushed and twisted to about 4mm deep (varies depending on placement).
- The punch is removed, leaving a hole and removing a small cylinder of skin tissue.
- Sometimes the tissue does not come out with the punch, so this is removed with sterile tweezers.
- The diver is popped into the hole – this diagram shows a tool holding the diver, personally I just use my thumb and 1st finger.
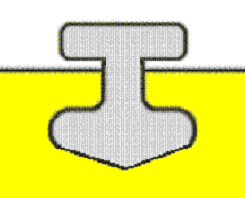
Cross section of a skin diver in place.
What Is A Dermal Punch?
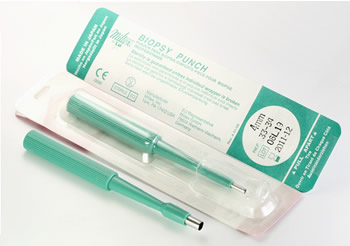
Dermal punches (AKA Biopsy punches, punches) are like tiny apple corers. They are a plastic handle with a metal cylinder attached at one end which is razor sharp. They are available in different diameters, but for dermals and divers, they are usually 1.5mm or 2mm wide (tongue and navel piercings are typically done at 1.6mm in diameter to give you an idea of size). They work by being pressed against the skin and being twisted. The sharp end slices out a perfect circle of tissue and once the punch has gone deep enough (around 4mm, but this varies with placement/anatomy) it is removed. Usually, the cored-out tissue comes out with the punch, but occasionally it has to be removed with sterile tweezers and scalpel. This is what they look like. The one in the packet looks about 1.5mm (which is used in skin diver piercing) the other one – out of the packet – looks much bigger, about 4mm.
So…. Which One Is Best? Dermals or Divers?
Both have their pros and cons, and a lot of it is personal choice. I had a dermal on my chest which stayed in for about 6 months and I had divers on each wrist which lasted over 2 years, but microdermals tend to have a longer shelf life. If you are unsure about which would be best for you, it may be down to where you want it as to which would be best.
Personally, I found microdermals on areas that had thinner skin had quite low success rate (hands/fingers for example) and skin divers in these places have worked better, though I do not recommend ANY piercing on hands/fingers. There are some places that either implant will work equally well (wrists, hips, chest, etc.) Some people have had more luck (trust me, luck is a factor!) with dermals and some with divers. However, it is important to remember that neither of these piercings is guaranteed to heal and stay put until YOU decide it’s time to take it out, often your body will just decide it doesn’t like it and kick it out. Because there isn’t much holding the piercing in place (especially when they are initially done and your body hasn’t had chance to close up around the jewellery), having them pulled or knocked can cause them to come out (this is what I meant when I said luck was a factor!) fiddling with the piercing or changing the dermal disc too often will also irritate them. I will go into more detail about aftercare later, but being gentle and leaving the implant to do its own thing is often the best option. See later in the blog for info on taking the piercings out and scarring.
Just because you’ve had a problem with one type of implant, doesn’t mean the other kind will do the same. It is possible to re-pierce the same site with a dermal or diver, but the scar tissue that will be present (even when fully healed) can cause the piercing to reject, so I would recommend trying a different site, even if it’s in the same area as the first piercing, just slightly higher or lower or to the side if it wasn’t a ‘centred’ placement.
Because of the unpredictable nature of this type of piercing, if you are considering more than one, I recommend getting just the one done at first and if it heals well and you are happy with it, then go for more (I would say give it at least 4 months before deciding whether or not to do more, just to be sure). A lot of people want formations done of multiple divers or dermals as shown below (neither by me – please comment if you can credit the artist!):
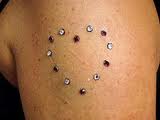

One of the problems with this is that is one of the piercings decides to come out (for whatever reason) then the whole effect would be ruined and the piercing may not be able to be re-done.
How Much Will This Hurt?
Nothing is painless as far as piercing is concerned. I found that both procedures were more uncomfortable than painful. Most people find it is more of a friction burn type pain than a scratch or a pinch; though this will vary from place to place on the body and person to person. Microdermals take a little longer than skin divers to do, and once the jewellery is in place, any pain stops. There may be some swelling and tenderness for a day or two (bruising and a small amount of bleeding is also normal, as with other piercings). As there is no ‘exit’ hole, which is usually the painful part of a traditional piercing, most people find them to be easier than expected.
How Do I Look After Them Once I’ve Had Them Done?
A lot of piercers jokingly refer people to the LITHA method (Leave It The Hell Alone!) which actually makes perfect sense with these piercings! Once I’ve done a dermal or diver, I will put a dressing over it (unless the client has told me they are allergic to dressings, in which case I will use a wad of tissue and some cling film where possible). I recommend leaving a dressing of some kind on for at least 1 week after having the dermal/diver done. I realise that some people don’t like plasters due to cleanliness issues, and changing the plaster every day is fine, but make sure it is kept covered, and gentle pressure is applied to the top of the implant by the plaster (this helps keep the jewellery under the skin until the body has chance to form a tight ring of scar tissue around the post of the jewellery). If the client is allergic to plasters I will ask them to use the tissue and cling film (or masking tape/surgical tape and tissue, as long as the client hasn’t had an allergic reaction to that too) on the piercing for a week or so – or if they know of a certain type/brand of plaster that they aren’t allergic to, just to use those as soon as they get home.
To clean (if keeping the area covered, I recommend doing the following every other day, so do it one day, miss a day, then do it the day after), use clean warm water to clean the piercing (and lathering up with a mild antibacterial wash) doing it in the bath or shower is usually good too, just make sure the water you rinse with is clean. I’ve found that pinching a cotton bud (with clean, dry hands) into a flat shovel-shape makes a perfect cleaning tool to get juuust under the edge of the disc. Use this to clean the piercing (you will need more than one cotton bud, as using the same one will just spread any bacteria from one side of the piercing to the other) and always make sure to dry your piercing thoroughly, pat/dab dry with a clean towel or tissue/cotton bud – do NOT rub dry – then replace the plaster once dry. After a week or so, you can leave the piercing uncovered, but I recommend cleaning gently once a day. ALWAYS (even when healed) cover your dermal/diver if you’re worried it may get knocked or bumped…. So stock up on plasters!
I have found – with both my dermal and my divers – that every now and again, the area gets a bit pink, tender and inflamed, even when the implant has been done for a number of months with no previous problems. When this has happened, I have applied light pressure around the implant, and some lymph fluid (clear/white/pale yellow gunk) has come out. After cleaning it away with clean water and a cotton bud – in the same way you would normally clean it – pop a plaster (or whatever you would normally use) over it and leave it for a day or two. This generally settles them, but return to your piercer if you are at all worried about the piercing. If you are doing any activity which may cause the dermal or diver to be knocked or pulled at (sports, concerts, work) then cover it with a plaster.
OK, How Do I Change My Microdermal Top? It’s REALLY Fiddly!
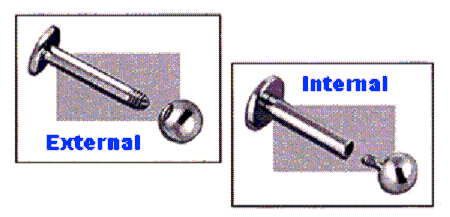
Yes, it is! A lot of people struggle with them, I had a microdermal done a few years ago and I couldn’t change it myself (though doing other peoples is no problem!) So, I don’t mind changing the jewellery for people free of charge when they buy the attachments from me. Most piercers will offer this service, so just ask. The jewellery is ALWAYS internally threaded (instead of externally threaded which is sometimes seen in body jewellery). You cannot interchange internally and externally threaded jewellery, but microdermal accessories are widely available, and I am happy to order in different items, just call in and ask. This diagram shows the difference in thread types with a labret stud:
So… What Happens If I Don’t Want The Dermal Or Diver Anymore?
If you decide to get rid (or if the jewellery is starting to grow out and you want rid before it grows out completely – which would cause more scarring) then both types are easy enough to remove. I’m happy to take out dermals or divers (if I didn’t do the initial piercing for you, I do have a small charge for this service, but if I did the dermal/diver, it’s free) if you feel you don’t want it anymore or if it’s being problematic.
Divers are easier to remove (as they are a smaller implant and there are no holes drilled in the base which tissue can grow through) and to be honest; you could probably get them out yourself. If I take out a diver, I’ll thoroughly clean the area, massage around the base to try and work the jewellery out, then holding the disc at the top, pull it out – sometimes a small incision (2mm max) is needed on the base, but 9 times out of 10, these pop out without any problems. There is usually a little blood – even if there isn’t an incision, and as when the piercing is 1st done I will pop a plaster or some tissue over the site and ask you to keep it on for a couple of days, and then just to keep it clean until it has settled down.
Removing dermals is a bit fiddlier as they are larger and have the holes drilled in the base. I would not recommend trying to do this yourself. The area is cleaned and massaged, and I will try and ease the dermal out, getting the shorter ‘heel’ of the implant out 1st and then working the rest of it out. More often than not, an incision along the length of the foot (about 5mm) has to be made if the dermal is not being removed because of a problem, and the tissue growing through the holes has to be severed, though this would be a very small piece of tissue to cut. Once the jewellery is out, a plaster or tissue is put over the site and left on for a couple of days until the area has settled, and then just keep it clean and it will heal in its own time.
The removal of dermals and divers is nowhere near as extreme as the removal of the original transdermal implants. There is very little blood and while the procedure will be a bit painful, it is generally no worse than getting the piercing in the 1st place. It’s worth noting that removing a fully healed dermal/diver is trickier to remove than one which has been problematic, as problematic ones are generally on their way out anyway.
If they are taken out, or decide to grow out, or if they are yanked out, or refuse to heal (refusal to heal is rare) then any scarring left is minimal. The site of the piercing often looks angry for a few weeks after removal. The hole will be healed up after a couple of days, and the area settled down within a few weeks. It is important not to pick at or scratch any scabbing/dry skin left by the removal, as this would cause more scarring. You can minimise the appearance of scars from them (or any other piercing) by using vitamin E lotion and/or Bio-Oil after a week or so when the wound has closed.
I think I have covered all relevant points in this blog, but if you would like more info on a certain part, or if I have missed out something, please leave a comment below.
FURTHER READING:
https://www.lynnloheide.com/post/microdermals-the-base-ics
https://www.lynnloheide.com/post/finger-dermals-and-other-bad-ideas
https://www.lynnloheide.com/post/surface-piercing-101-what-to-know-before-you-pierce (this one also touches on surface piercing – see my other blog for more!)